OpusClip vs vidIQ: I Tested Both AI Clipping Tools (Here’s the Winner)
Last updated: July 2026
Author: Greg Preece — I test AI video tools hands-on to help creators streamline their post-production workflow and grow their audience.
Repurposing long-form content into bite-sized shorts is one of the fastest ways to build an audience. But choosing the right software can make or break your workflow. In this guide, I put the industry-standard AI clipping tool, OpusClip, head-to-head against vidIQ's newly released AI clipping feature using a real podcast episode to see which tool reigns supreme.
Quick Summary: Which Tool Is Best for You?
| Feature / Metric | [OpusClip](/articles/best-ai-clipping-tool-for-podcast-shows) | vidIQ |
|---|---|---|
| Supported Platforms | YouTube, Twitch, Rumble, Zoom, Google Drive, Local upload | YouTube video link, Local upload |
| Clip Length Control | Highly customizable (<30s up to 15 mins) | Fixed presets (45–60s, 60s+) |
| Aspect Ratio Options | Vertical (9:16), Square (1:1), Horizontal (16:9) | Vertical (9:16) only at setup |
| Processing Speed | Fast (10–15 mins for a podcast) | Slow (50–55 mins for a podcast) |
| Clip Yield (My Test) | 35 clips generated | 16 clips generated |
| Editing Tools | High-level (Auto-B-roll, silence/filler word trim, audio enhance, captions) | Basic (Manual crop, text box placement, split layouts) |
| Free Tier / Starter Pricing | Free account (60 monthly credits) / Starter: $15/mo (~£11) | Requires Boost Tier (£19/mo) / Free is limited to 150 credits |
Prefer to watch? Here's the video. Prefer to skim? The full breakdown is below.
Quick Links
- OpusClip: Try OpusClip →
- vidIQ: Try vidIQ →
Table of Contents
- How I Tested Both Tools
- The Setup: Upload Options and Customization
- Clipping Speed: The Big Discrepancy
- The Results: Clip Yield and Quality Scores
- In the Editor: Simple Cuts vs. Advanced AI Enhancements
- Pricing and Credit Efficiency
- Final Verdict: Which Tool Should You Choose?
- Frequently Asked Questions
How I Tested Both Tools
To find out which tool delivers the best, most engaging short-form content with the least amount of effort, I decided to run an identical test on both platforms. I have active accounts with both vidIQ and OpusClip. I took a single long-form podcast episode and processed it simultaneously in both software suites.
My goal was to compare their setup workflows, rendering speeds, final clip yields, editor capability, and general pricing structures to give you an unbiased, objective evaluation of where your money and time are best spent.
The Setup: Upload Options and Customization
A seamless ingest pipeline is critical if you publish frequently or manage clipping for clients. Here is how the initial ingestion and setup configurations differ between the two platforms.
How Setup Works in vidIQ
vidIQ’s clipping tool is designed specifically for YouTube creators. Its interface is straightforward but relatively limited in its input compatibility and configuration options.
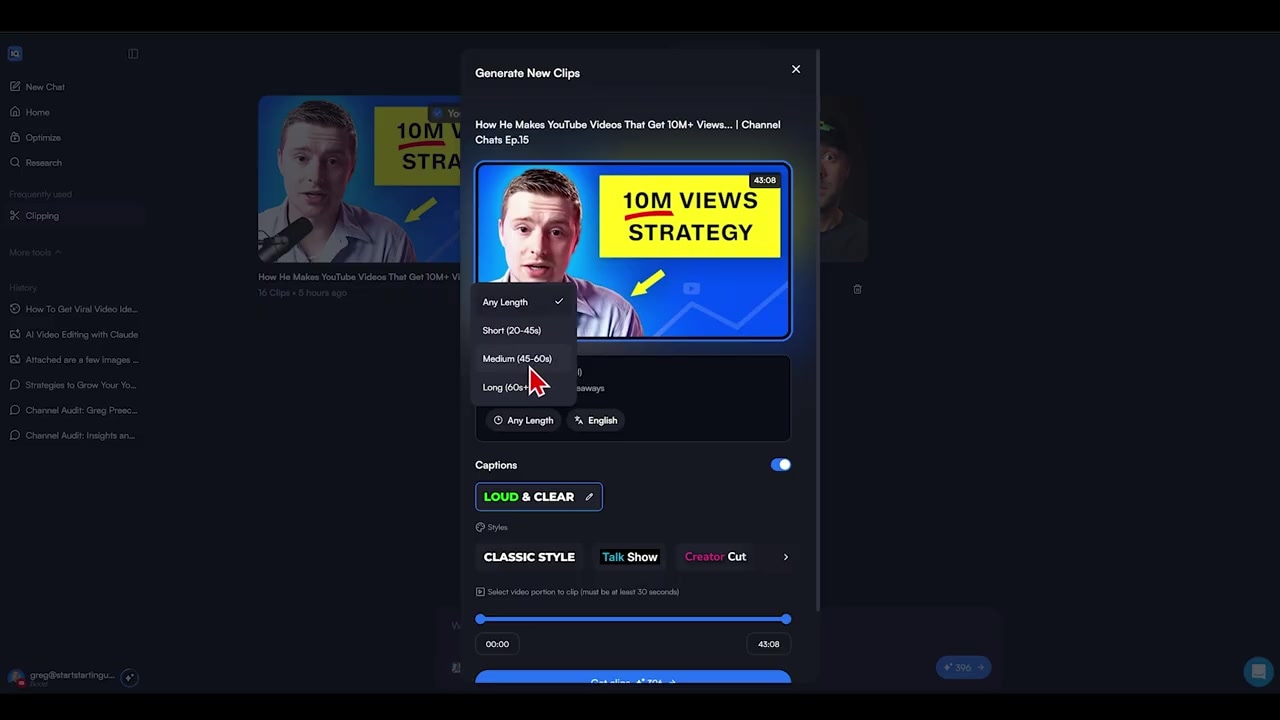
Caption: Paste a YouTube link, set video language, and select a duration target inside vidIQ.
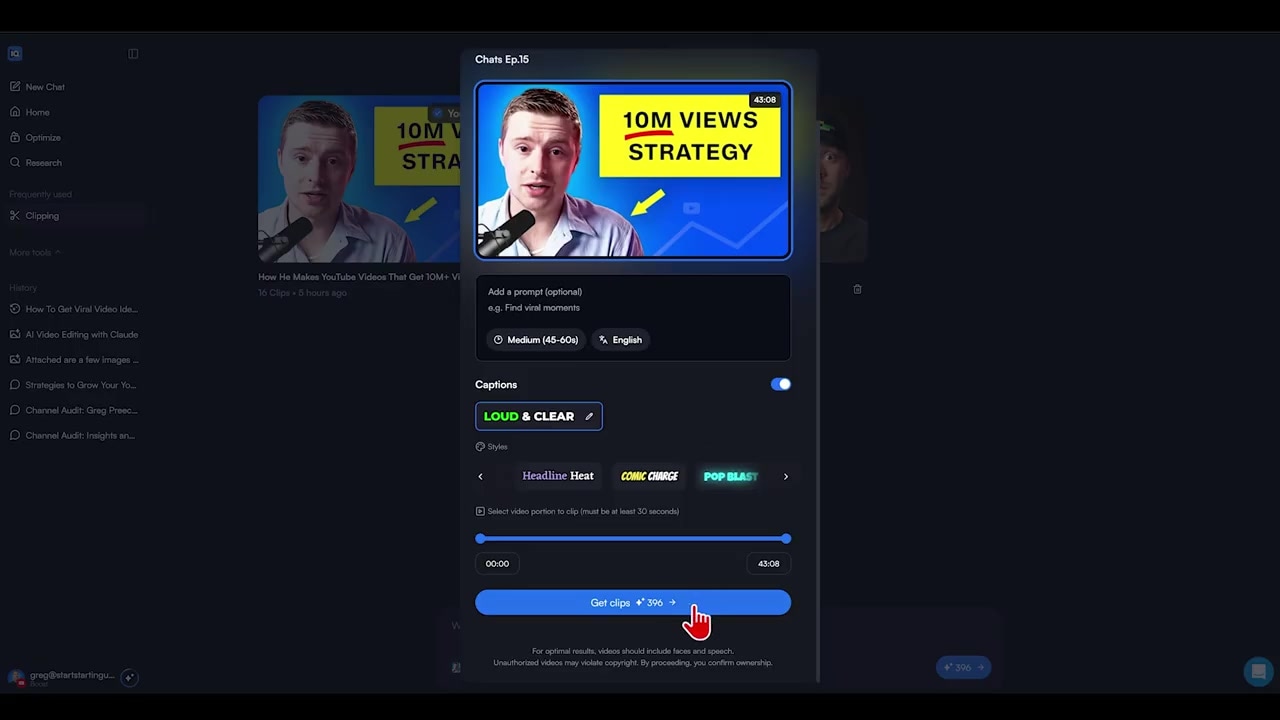
Caption: You can choose a preset caption style and check how many credits the clipping process will cost.
What it does & who it's for: vidIQ's clipping feature is a fast add-on tool built for YouTube creators who already subscribe to the vidIQ platform and want a simple way to pull vertical highlights from their channel.
Try it here: Try vidIQ →
To set up a clipping project in vidIQ, follow these steps:
- Navigate to the Clipping tab from your dashboard.
- Paste your YouTube link or upload a video.
- Select your video’s language (e.g., English).
- Set your clip length target (vidIQ offers options like 45–60 seconds, but lacks highly customizable under-30-second ranges).
- Choose a preset caption style and confirm the credit cost before clicking Get Clips.
How Setup Works in OpusClip
OpusClip is a dedicated video-repurposing engine. Because it isn't locked down as a YouTube extension, its setup offers significantly more input integrations and initial formatting controls.
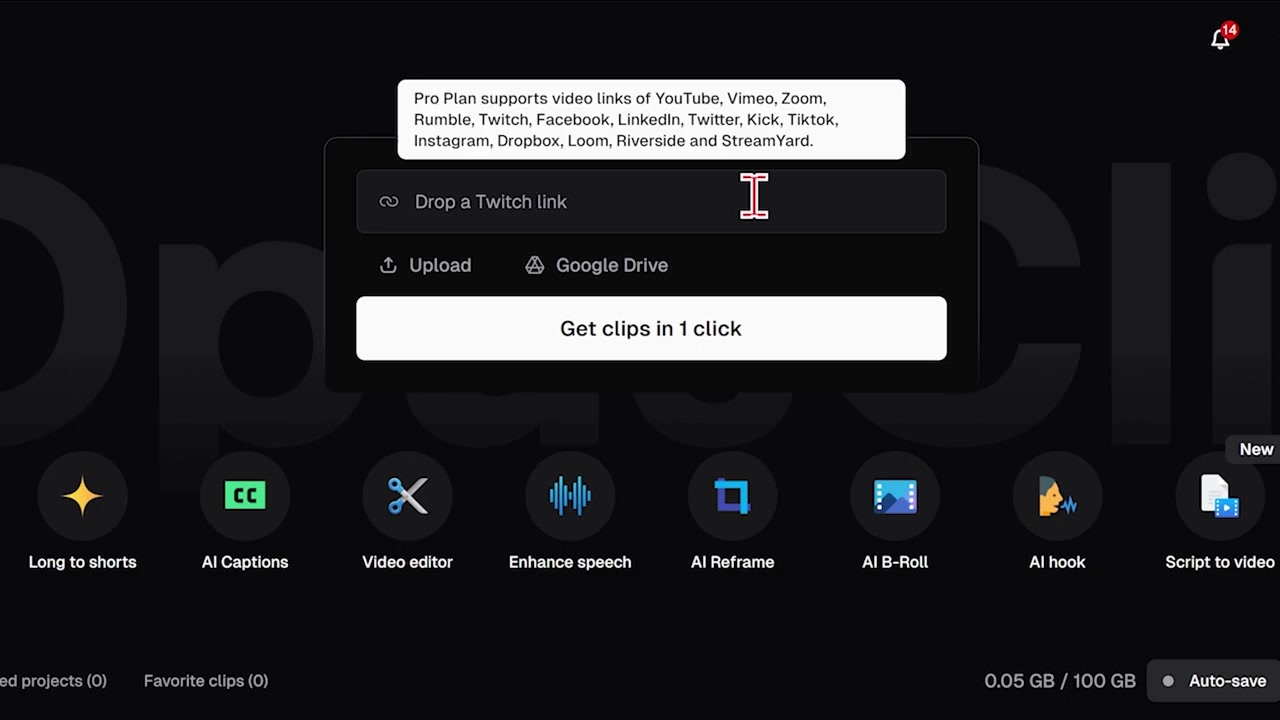
Caption: OpusClip allows importing from a wider array of sources, including Twitch, Rumble, Zoom, and Google Drive.
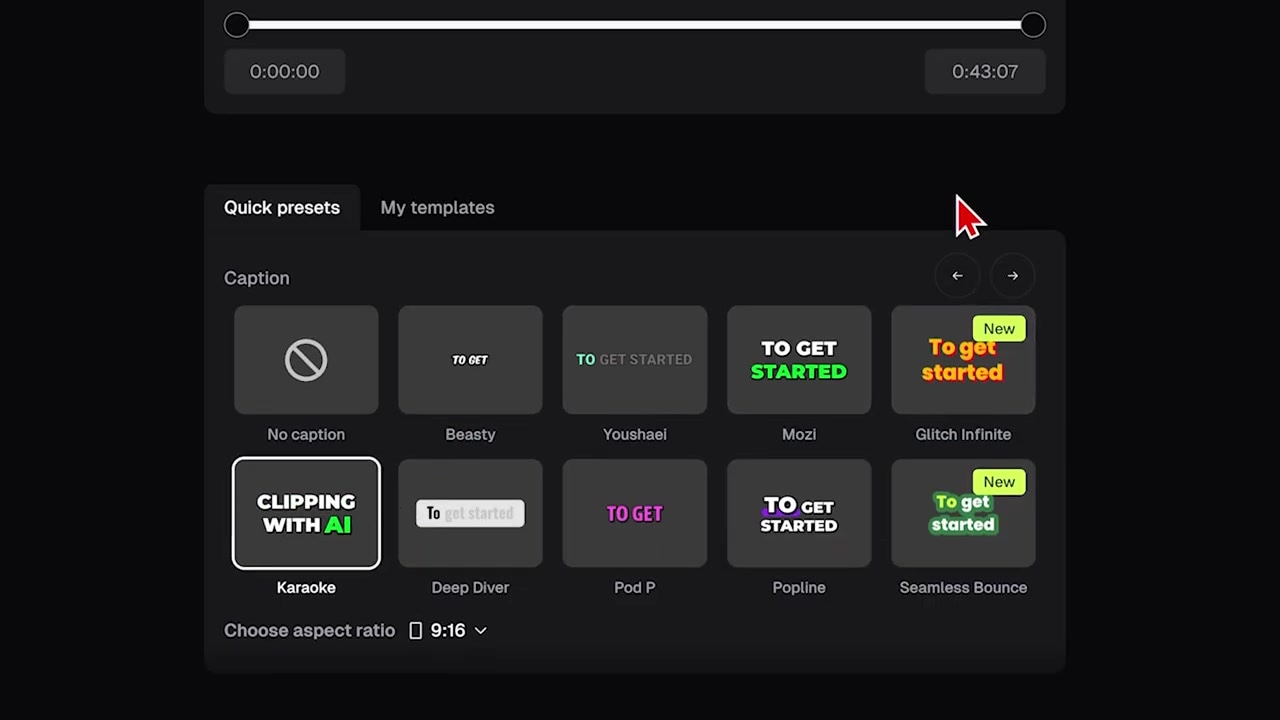
Caption: Select your target crop aspect ratios and highly flexible duration presets inside the configuration panel.
What it does & who it's for: OpusClip is a dedicated cross-platform repurposing tool built for content agencies, podcasters, and multi-channel creators who need to ingest footage from diverse sources and export polished clips in multiple aspect ratios.
Try it here: Try OpusClip →
To set up a clipping project in OpusClip, follow these steps:
- Paste a link from YouTube, Twitch, Rumble, or Zoom, import a video directly from Google Drive, or upload a local file.
- Select or allow the tool to auto-detect your video language.
- Choose your video genre (e.g., Podcast) so the AI understands how to track speakers.
- Set your clip length target (presets range from less than 30 seconds, 30–60 seconds, and 60 seconds up to 10–15 minutes).
- Opt to auto-add AI hooks, pick caption presets, and set your desired aspect ratios (Vertical, Square, or Horizontal) before clicking Get Clips.
Clipping Speed: The Big Discrepancy
If you manage a high volume of content—either for your own brand or for clients—post-production speed is everything. This is where I encountered a massive difference between the two tools.
- OpusClip processing time: 10 to 15 minutes to clip up the entire test podcast.
- vidIQ processing time: 50 to 55 minutes to process the exact same file.
OpusClip performed the entire operation nearly three to four times faster. In an agency or high-yield creator setting, waiting almost an hour for a single podcast run inside vidIQ can heavily bottleneck your publishing pipeline.
The Results: Clip Yield and Quality Scores
Once both platforms finished processing, I navigated to their respective project screens to analyze what the AI actually delivered.
The Resulting Clips Dashboard: vidIQ vs. OpusClip
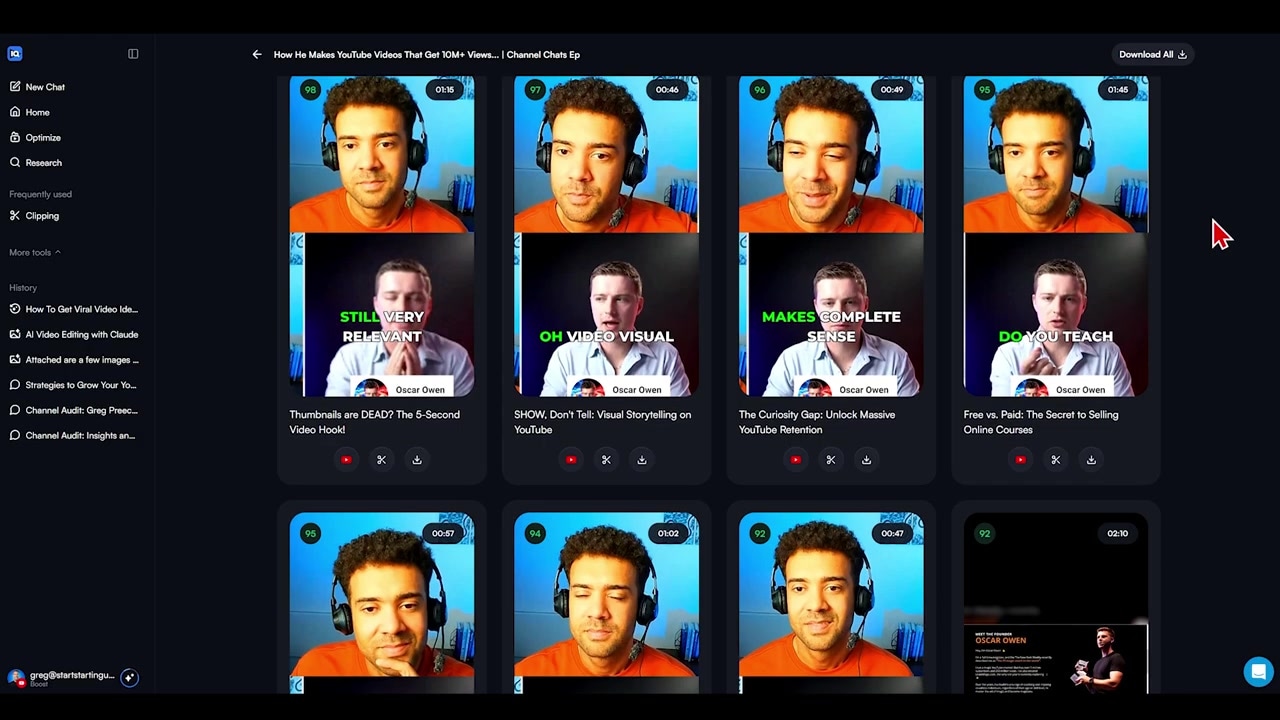
Caption: vidIQ generated 16 total clips with individual rating scores displayed on each thumbnail.
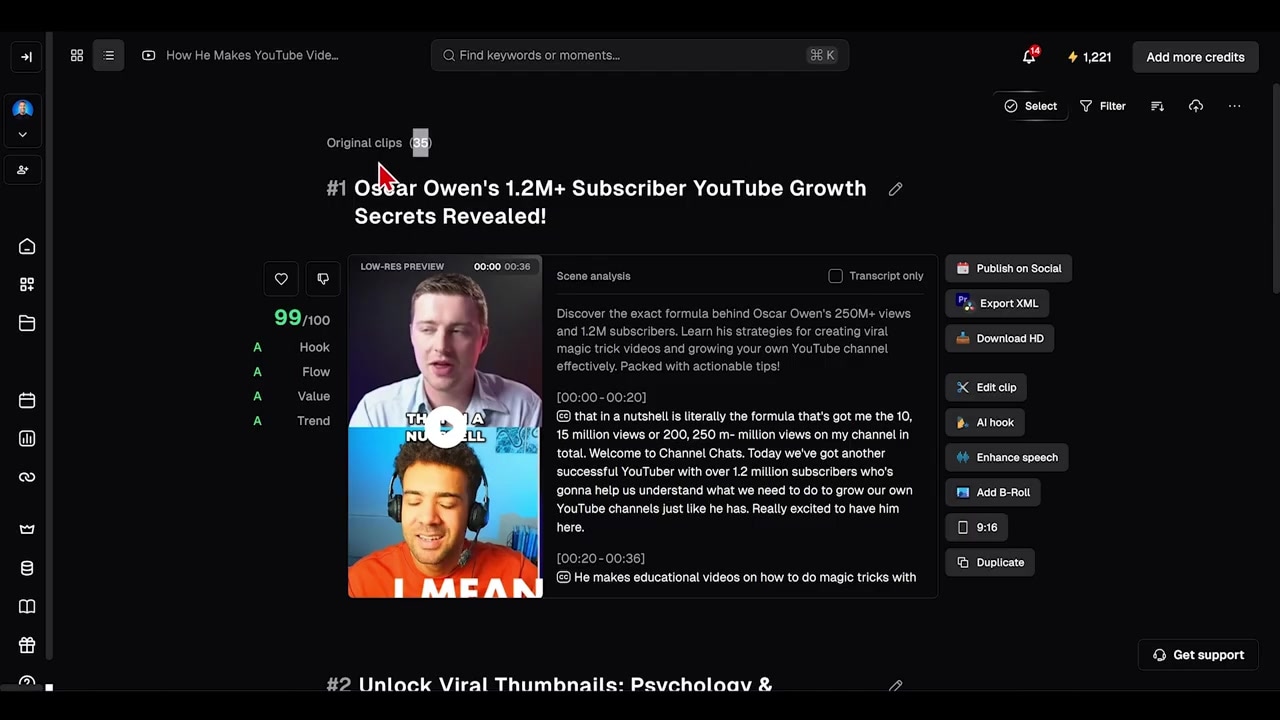
Caption: OpusClip generated 35 clips from the same video, showing quality scores and quick social scheduling options.
Here is how the outputs compared:
- vidIQ yielded 16 total clips. The dashboard displays them in a grid, with a virality score in the top-left corner of each clip. You have straightforward download buttons and scissor icons to enter the basic editor.
- OpusClip yielded 35 total clips—more than double the output of vidIQ from the exact same episode. OpusClip also assigns a detailed virality rating to each clip. However, its dashboard goes further by integrating direct publishing capabilities. Once you connect your TikTok, YouTube, Instagram, or Facebook pages, you can post or schedule clips directly from OpusClip with a single click.
In the Editor: Simple Cuts vs. Advanced AI Enhancements
Most clips generated by AI require minor tweaks. The depth of the built-in video editor determines whether you can finalize the video on-site or if you have to export it into professional editing software.
Editing Clips in vidIQ
vidIQ’s editor focuses on simple layouts and basic text-positioning adjustments.
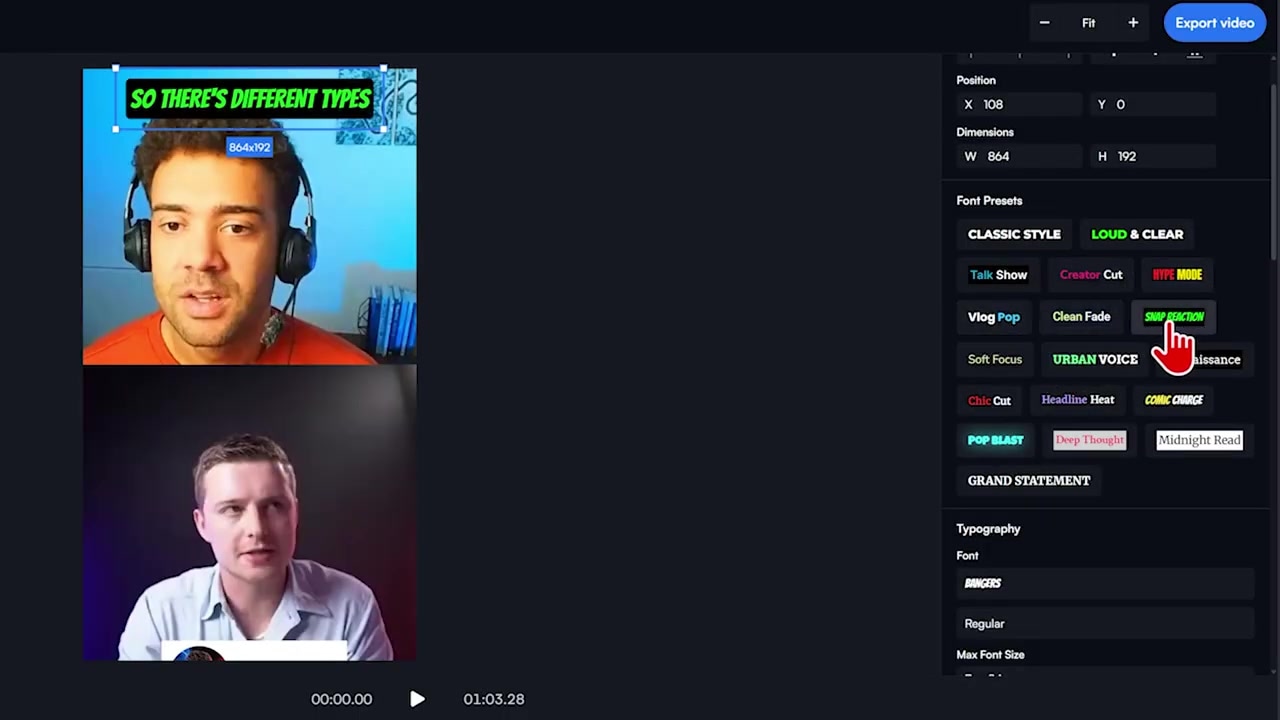
Caption: Adjust the vertical positioning of the secondary video source or edit basic caption options inside vidIQ.
When I entered the vidIQ editor to adjust my podcast clip, I found a two-source layout stacking my video on top and my guest Oliver’s video on the bottom:
- Layout Presets: You can toggle between "Fit", "Fill", and "Split" formats. However, when I selected "Split" (which is meant to place the host on the left and guest on the right), the layout bugged out and displayed both of us twice on screen.
- Captions: Editing captions is straightforward. You can drag the text box freely, align text, adjust sizes, change fonts, and recolor words. You can also delete secondary video layers if you want to keep the frame focused solely on a single speaker.
Editing Clips in OpusClip
OpusClip's editor is significantly more robust, reflecting its tenure as a dedicated clipping platform.
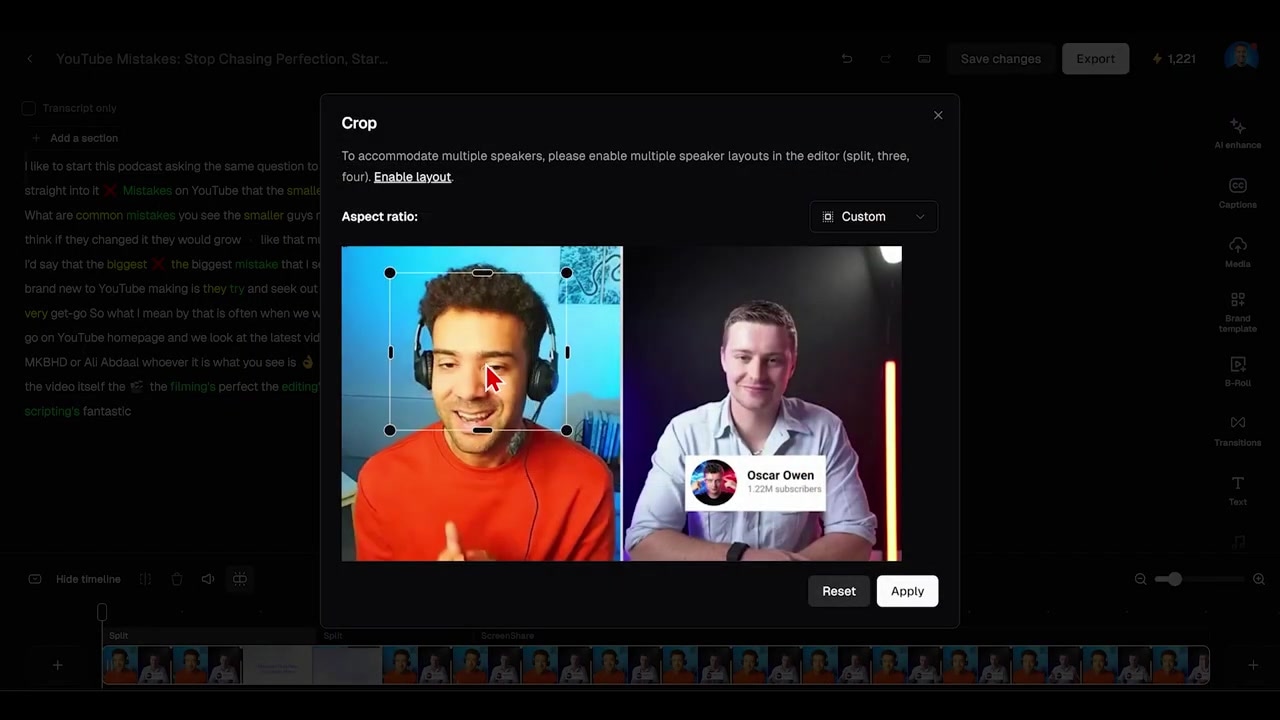
Caption: OpusClip's editor allows crop target refinement and multiple advanced screen layout structures.
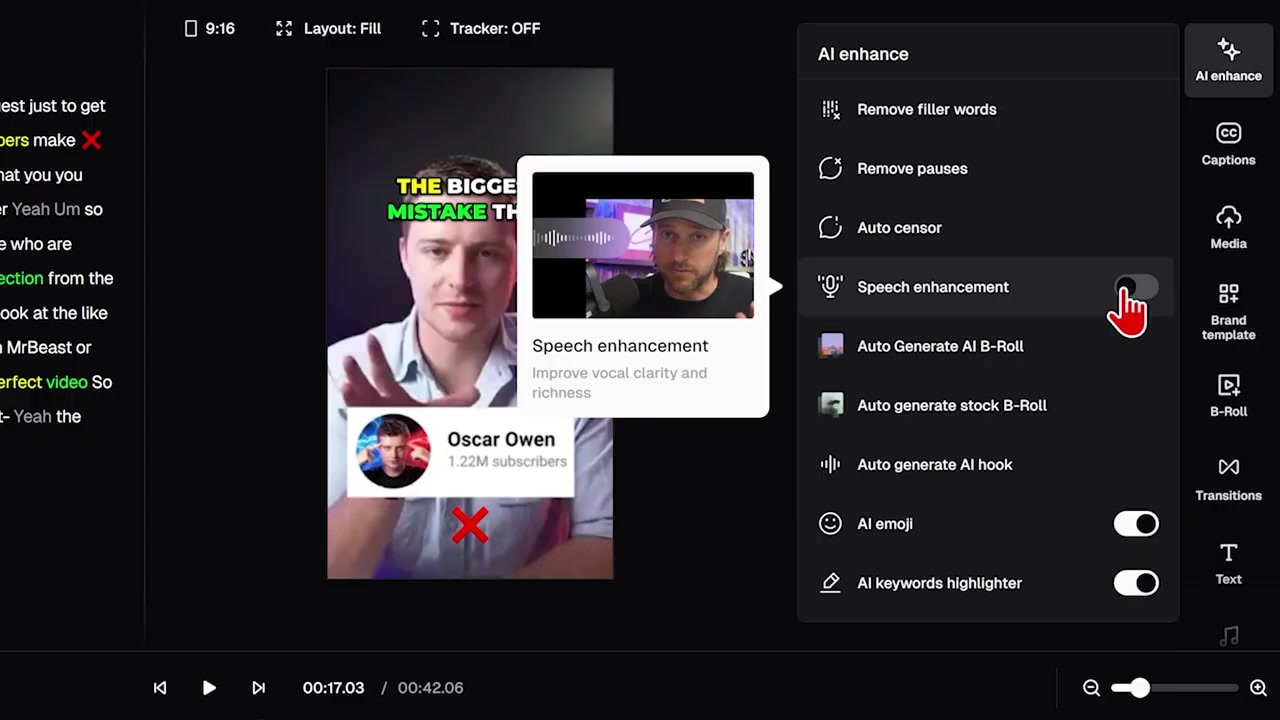
Caption: Access advanced options like auto-B-roll creation, filler word removal, audio enhancement, and background music overlays.
The editing capabilities in OpusClip are far more deep and professional:
- Advanced Layouts: Aside from traditional split-screen, you can choose layouts designed specifically for three speakers, gameplay layouts (facecam over gameplay feed), and manual cropping tools to pinpoint exactly where the focus should be.
- Smart Captions & Highlighting: The caption editor gives you a live highlight preview of the script. Hovering over words lets you see which ones will be highlighted in the caption track, and you can edit both the words and colors on the fly.
- AI Enhance Suite: This is where OpusClip really shines. With a single click, you can toggle:
- Remove Filler Words: Automatically cuts out "um" and "uh" pauses.
- Remove Dead Pauses: Tightens up the flow of the conversation.
- Speech Enhance: Resolves poor microphone quality by clarifying the dialogue.
- Auto B-Roll: Generates and overlays contextual B-roll footage over your clip automatically.
- Background Music: Adds royalty-free music underneath your shorts and aligns it directly to your timeline.
Pricing and Credit Efficiency
The credit cost per project is another major factor to consider before committing to a subscription. Here is a breakdown of how both systems charged me to run the same test episode:
- vidIQ Credit Usage: This podcast episode cost 396 credits to process.
- Free Tier: Offers 150 credits per month (not enough to process this single project).
- Required Upgrade: To clip this video, you need to purchase the Boost plan, which costs £19/month and provides 2,000 credits. Here is what every vidIQ plan actually costs.
- OpusClip Credit Usage: The same episode cost 43 credits to process.
- Free Tier: Offers 60 credits per month.
- Required Upgrade: Since 43 credits fits within the free monthly allotment, I was able to run this project for free. If you need more, upgrading to the Starter plan costs only $15/month (~£11), which is significantly cheaper than vidIQ's entry-level pricing.
Final Verdict: Which Tool Should You Choose?
Both vidIQ and OpusClip offer capable AI-driven solutions to speed up your content creation, but they serve completely different needs.
Choose vidIQ if:
- You are already paying for a high-tier monthly vidIQ subscription for its YouTube SEO tools, keyword research, and daily content ideas.
- You only need to make basic vertical clips occasionally, and you aren't fussy about deep editing customization, processing speed, or advanced AI audio/visual enhancements.
Choose OpusClip if:
- You are serious about short-form distribution and need the absolute best tool to save time.
- You need 3x faster processing speeds, double the clip yield per run, and advanced editing features like automatic filler word removal, audio enhancement, and automated B-roll overlays.
- You want a cheaper, highly efficient entry tier to start scaling your content across TikTok, Reels, YouTube Shorts, and beyond.
Frequently Asked Questions
Can I try vidIQ clipping for free?
vidIQ does offer a free tier with 150 credits per month, but longer video files (like the podcast used in our test) often exceed this limit, requiring you to upgrade to their Boost plan (£19/mo) to process them.
What platforms can OpusClip import from?
Unlike vidIQ which primarily focuses on YouTube URLs, OpusClip supports direct imports from YouTube, Google Drive, Twitch, Rumble, Zoom, or via local file uploads.
Does OpusClip have automated B-roll?
Yes, OpusClip includes an automated B-roll generator that places relevant secondary footage over your clips to make them more visually engaging with a single click.