11 Labs Tutorial: How I Use ElevenLabs V3 for Ultra-Realistic Voices
Last updated: 29 September 2026
Author: Greg Preece — I test AI video and voiceover tools hands-on to help creators produce highly realistic content without wasting hours in post-production.
Most AI voiceovers sound flat, robotic, and cheap. But with the release of the ElevenLabs V3 model, you can now inject genuine human emotion—like laughter, whispers, or shouts—directly into your voiceovers using simple text prompts.
This hands-on tutorial will walk you through exactly how I use ElevenLabs V3's latest features to generate expressive, multi-speaker dialogues and native sound effects in minutes.
⚡ ElevenLabs V3 Quick Summary
- The Big Update: ElevenLabs V3 introduces audio tags (
[laughs],[whispers]) and built-in multi-speaker dialogue directly in a single generation.- Best Practice: Always choose voices under the "best voices for V3" tab to ensure optimal emotional inflection and tag interpretation.
- Inline Sound Effects: You can now insert audio tags like
[thunder]or[door creak]directly into your text prompts to generate matching background sound effects.
Table of Contents
- [Step 1: Activating the [ElevenLabs](/articles/elevenlabs-pricing) V3 Engine](#step-1-activating-the-elevenlabs-v3-engine)
- Step 2: Directing Emotions with Inline Audio Tags
- Step 3: Filtering for V3-Optimized AI Voices
- Step 4: Generating Seamless Multi-Speaker Dialogue
- Step 5: Injecting Sound Effects Directly into Your Script
- ElevenLabs Pricing: Which Plan Do You Need?
- Next Steps: Professional Voice Cloning
- Frequently Asked Questions
Prefer to watch? Here's the video. Prefer to skim? The full breakdown is below.
Quick Link
Try it here: Try ElevenLabs →
Step 1: Activating the ElevenLabs V3 Engine
To get started with this 11 Labs tutorial, open up your workspace. (A quick branding note: the platform is officially spelled ElevenLabs using the word "eleven," not the numeral "11," though many search for "11 Labs"!)
- Navigate to Text to Speech from the left-hand sidebar menu.
- Click the model selector dropdown located at the top of your text input workspace.
- Select Eleven v3 (or the V3 option).
This is a big step up from v2 for emotion and delivery. ElevenLabs has since released v4, which is now its most powerful engine. It acts as the technical foundation for every advanced audio tag and dialogue feature we are going to use today.
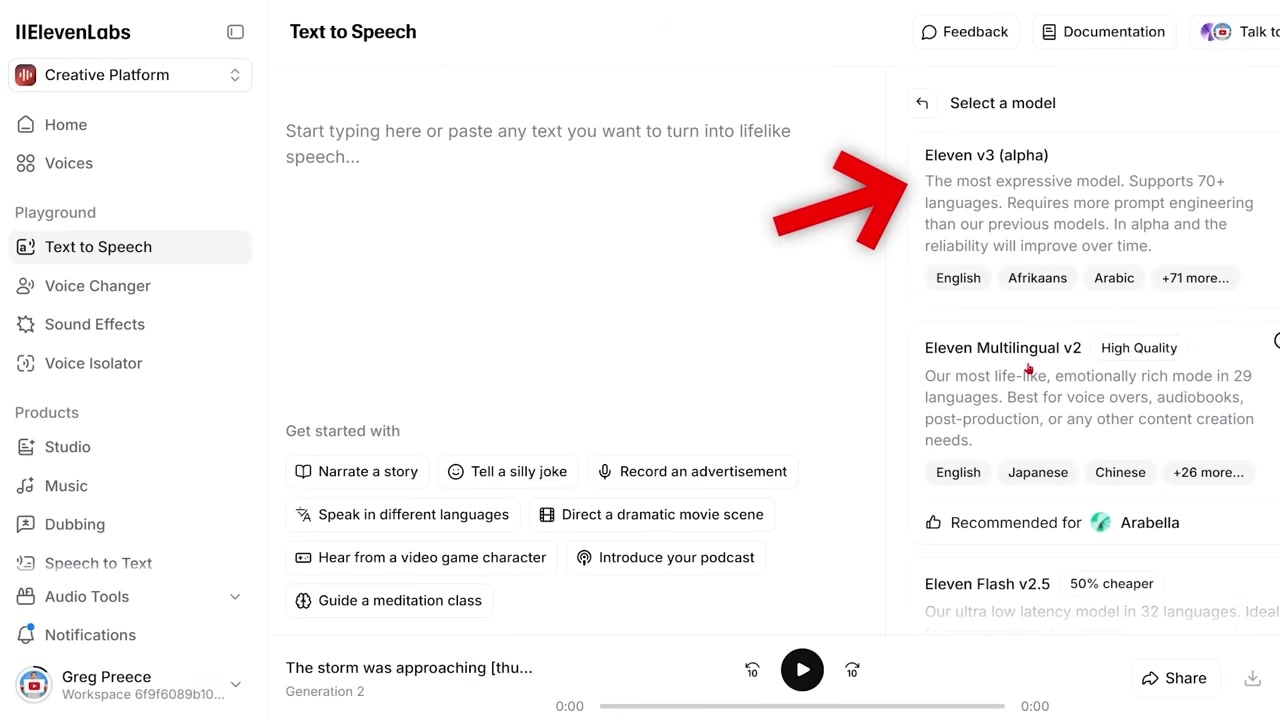
Caption: Make sure to select the new V3 model from the dropdown list before generating your audio to unlock advanced performance tags.
Step 2: Directing Emotions with Inline Audio Tags
The biggest issue with AI speech is that models typically "read" text instead of "performing" it. ElevenLabs V3 solves this by introducing inline audio tags.
These are performance directions wrapped in square brackets that tell the AI how to deliver a specific line. To use them, write your emotion or physical action in square brackets directly inside your text script.
For my test, I pasted this exact script into the editor:
"This is incredible technology. [laughs] I can't believe how realistic this sounds. [whispers] And I can even change my emotion [sad] and become sad as I'm talking."
When you click generate, the AI doesn't read the bracketed words out loud. Instead, it interprets them as performance cues:
[laughs]prompts a brief, realistic chuckle mid-sentence.[whispers]causes the voice's volume to drop and the texture to become breathy.[sad]shifts the inflection, slowing down the pacing and lowering the pitch to sound somber.
This gives you a genuine voice acting performance rather than a flat, synthetic text-to-speech reading.
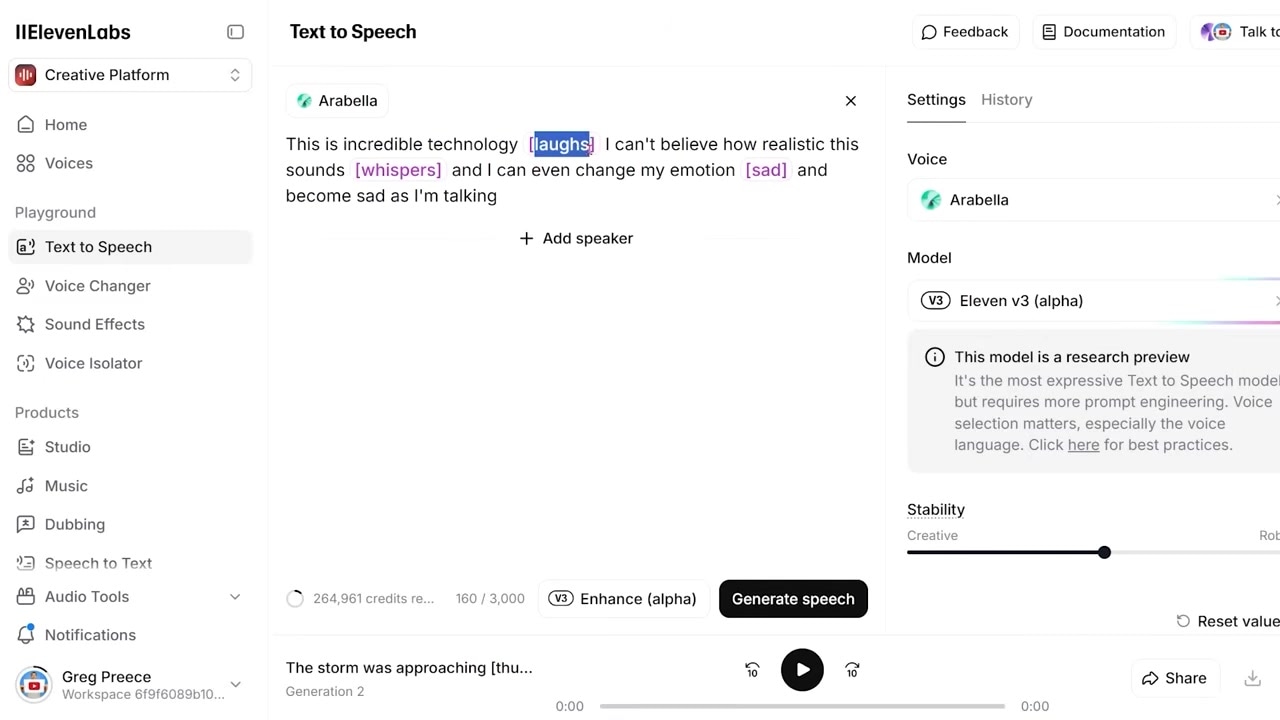
Caption: Enter emotional and performance tags like [laughs] or [whispers] directly within your script to direct the voice's delivery.
Step 3: Filtering for V3-Optimized AI Voices
A common mistake is picking a random voice from your library and expecting V3's audio tags to work flawlessly. When I transitioned from V2 to V3, I learned that there is actually a science to voice selection.
To ensure your character can handle dynamic emotional inflections, follow these steps:
- Click on your active voice profile to open the voice selector workspace.
- Select the "best voices for V3" filter.
- Preview the characters in this curated section. These profiles have been explicitly optimized for the wider dynamic range of the V3 engine.
- Select your preferred voice, scroll down, and click Add to Voices to load them into your current generation panel.
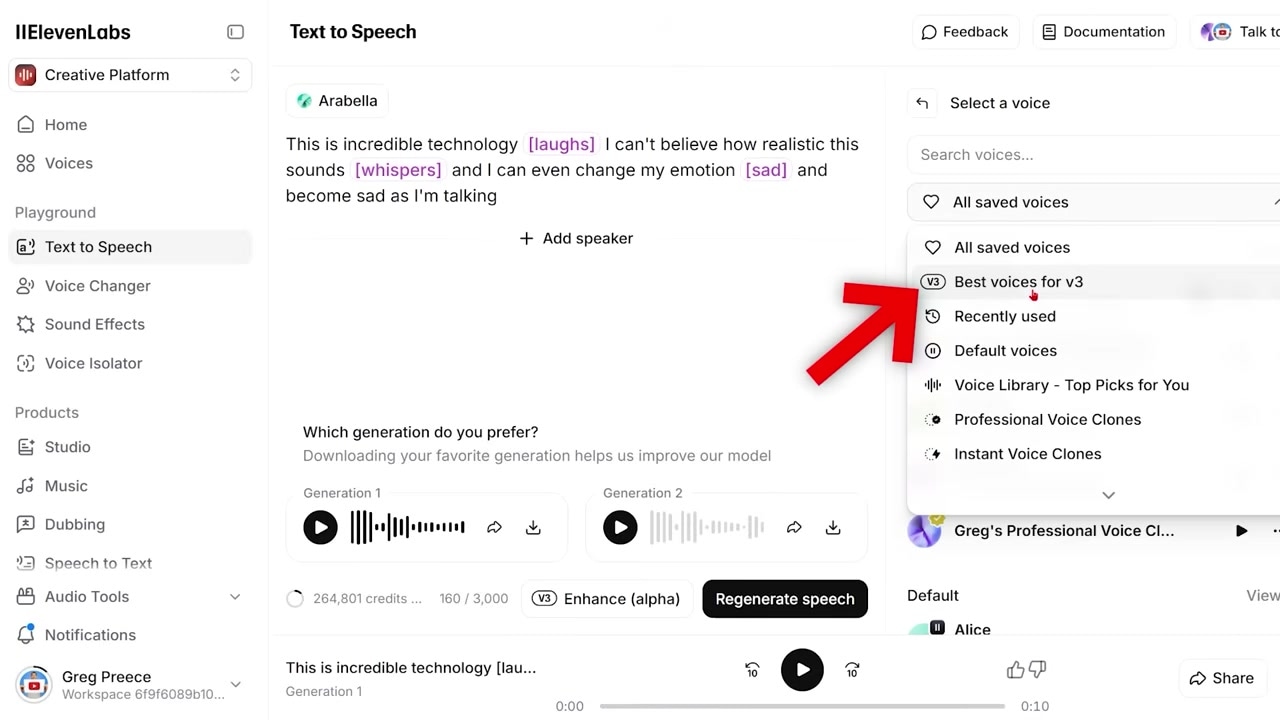
Caption: Filter the voice selection list by the 'best voices for V3' category to ensure your characters properly interpret your audio tags.
Step 4: Generating Seamless Multi-Speaker Dialogue
In the past, creating dialogue between multiple characters was a tedious, multi-step chore. You had to:
- Generate Speaker A's lines and download them.
- Generate Speaker B's lines and download them.
- Import both files into a video or audio editor.
- Manually cut and align the clips to establish a natural conversational rhythm.
V3's native Dialogue Mode allows you to build multi-voice conversations directly in the editor with a single click.
How to Set Up Dialogue Mode:
- In your generation panel, click the Add Speaker option to add a second voice profile to the workspace.
- Assign your characters. In my workflow, I assigned Grimblewood as Speaker 1 and Juniper as Speaker 2.
- Write your dialogue script directly in the alternating text boxes.
- Click Generate Speech a single time.
The model will render the entire conversation as a single, unified audio file. Because the AI processes the context of the entire exchange, the handoff between characters sounds remarkably human—retaining natural pauses, room tone, and breathing transitions.
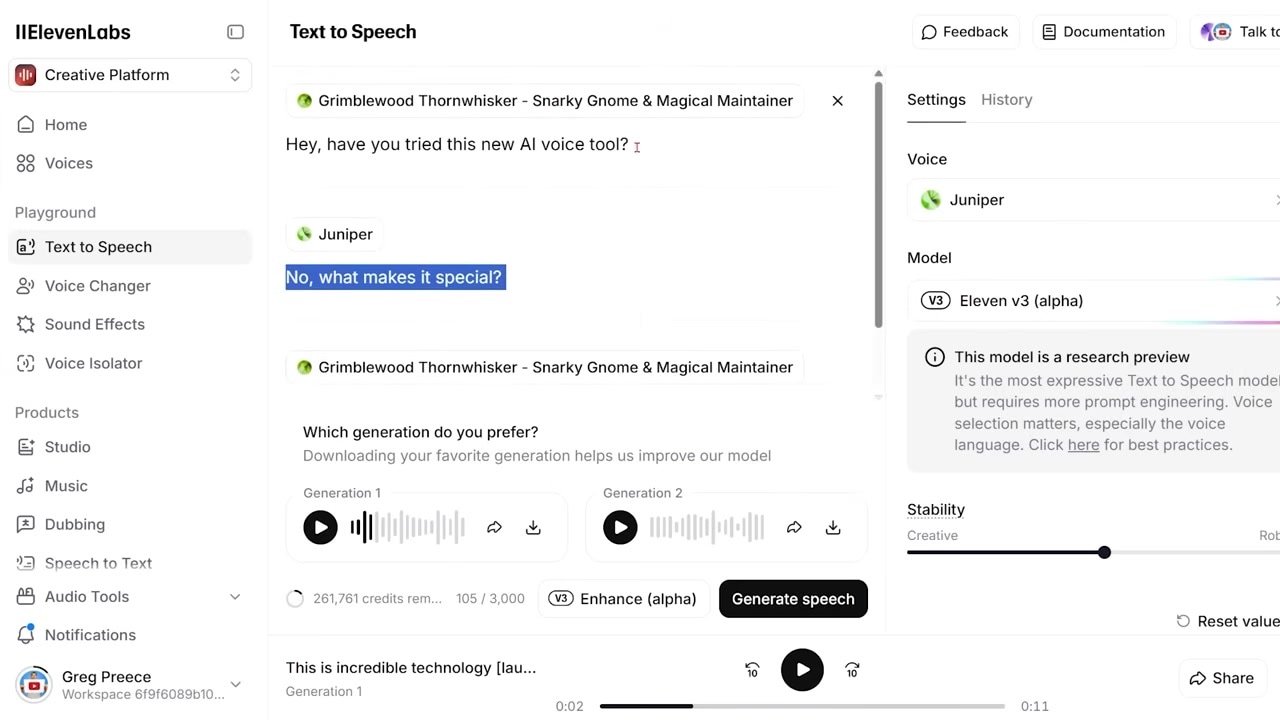
Caption: Add multiple speakers and assign lines to create a seamless conversation that generates in a single click.
Step 5: Injecting Sound Effects Directly into Your Script
One of the most impressive features in the V3 model is the ability to generate ambient sound effects directly from your text prompt.
By using bracketed tags for environmental sound cues, you can generate background audio events mid-sentence. For example, I tested the following line in my script:
"The storm was approaching [thunder] and we needed to find shelter quickly [rain sounds] before it got worse."
Troubleshooting Sound Effect Generation
Because the V3 model is highly experimental, sound effects do not always render perfectly on the first attempt. If your generated audio sounds flat or ignores the sound effect tags, use my three-step troubleshooting workflow:
- Be More Descriptive in Your Tags: If
[thunder]doesn't trigger, rewrite the tag to be more explicit, such as[thunder sound]. - Adjust the Creativity Settings: Open your voice settings panel and pull the creativity slider down toward the Creative end of the spectrum. Giving the model more creative freedom makes it more receptive to generating non-verbal sound events.
- Regenerate the Audio: It took me three separate generations and a slight tag tweak to get the perfect blend, but the final output successfully nested realistic thunder claps and background rain directly behind the speaker's voice.
I have tested this workflow successfully with tags like [applause], [door creak], and [crowd sounds], saving me from having to search external audio libraries for background assets.
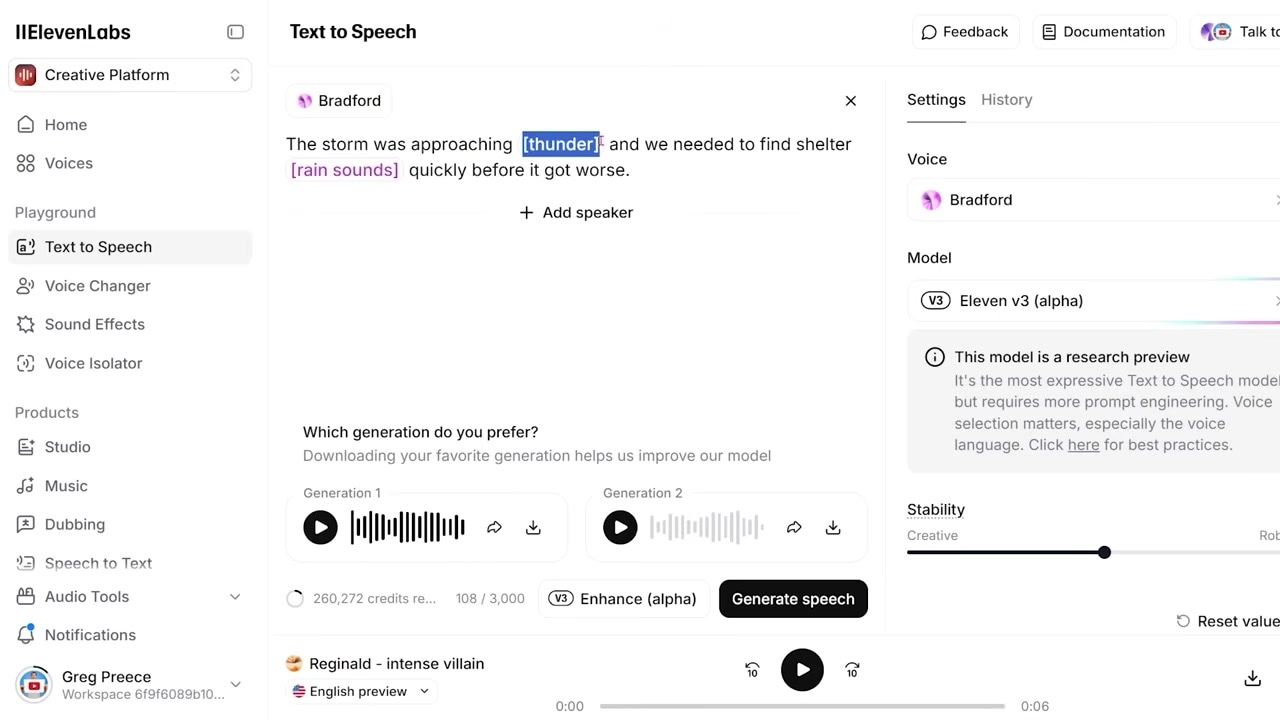
Caption: Insert sound effect prompts like [thunder] or [rain sounds] directly in between your text characters.
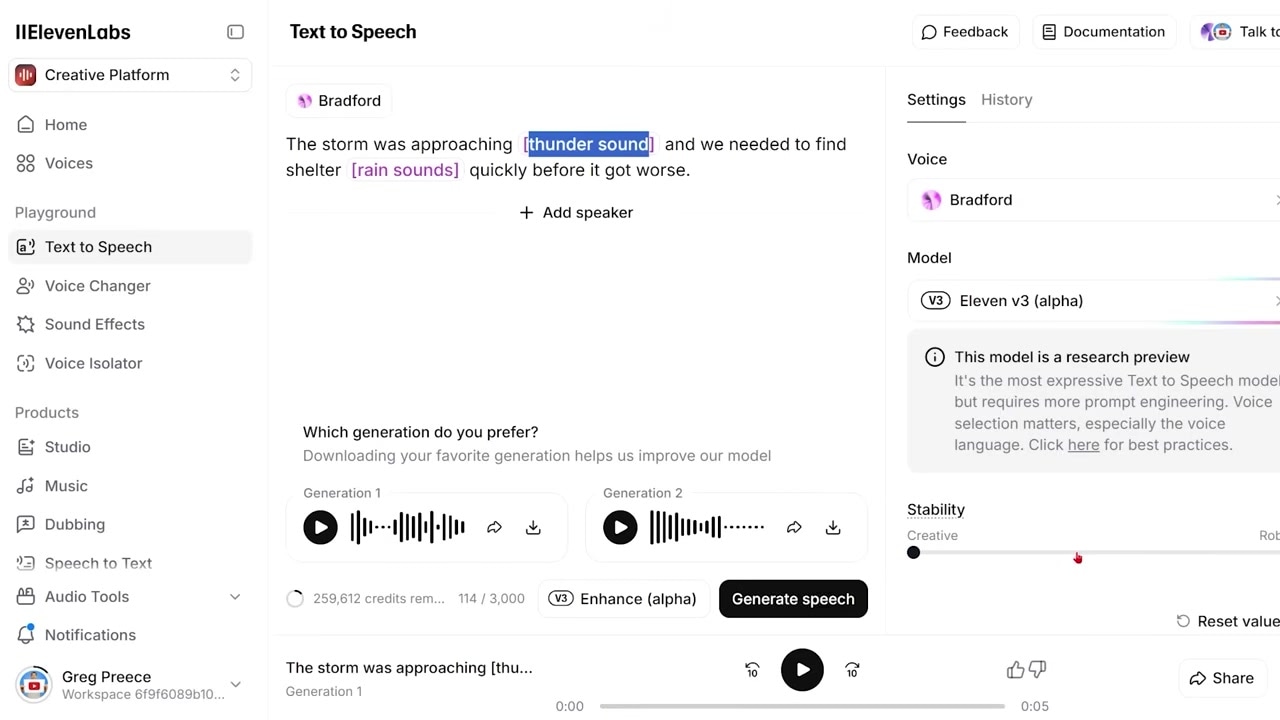
Caption: If sound effects don't generate properly on the first try, try modifying the text tag or sliding the creative controller downward.
ElevenLabs Pricing: Which Plan Do You Need?
If you want to start testing these V3 features hands-on, ElevenLabs offers highly accessible entry-level plans:
- Free Plan: Provides 10,000 monthly credits. This is an excellent tier for testing out audio tags, trying different V3-optimized voices, and generating short scripts.
- Starter Plan ($6/month): Provides 30,000 monthly credits and unlocks advanced creator tools, including professional voice cloning, multi-language dubbing, and AI music generation.
If you are ready to test these features yourself, you can sign up for a free account here: Try ElevenLabs →
Next Steps: Professional Voice Cloning
Once you have mastered emotional audio tags and multi-speaker dialogue, the logical next step is cloning your own voice.
By uploading a clean recording of your voice, ElevenLabs can generate an identical digital replica. You can then apply all of V3's emotional audio tags to your cloned profile, letting you scale your content production while maintaining your unique vocal identity.
Frequently Asked Questions
Why is ElevenLabs reading my emotional tags out loud instead of performing them?
This is a common issue that typically happens if you are running an older model (like V1 or V2). Double-check that you have the V3 model selected in the dropdown menu. Additionally, ensure your bracketed tags (e.g., [laughs]) are placed naturally inside a full sentence so the model can read the surrounding context.
What sound effects work best inside the Text to Speech editor?
V3 excels at simple, atmospheric sound effects like [applause], [thunder], [rain sounds], [crowd murmurs], and [door creak]. Complex actions or highly specific sounds may require multiple generations or adjustments to your voice settings slider.
Can I mix a custom cloned voice with preset voices in dialogue mode?
Yes. When setting up your multi-speaker dialogue workspace, you can assign any voice profile in your account to individual lines—including preset library voices, custom-designed voices, and your own cloned voices.