I Tested This AI Video Editor: How I Save 3 Hours on Every Edit
Last updated: July 2026
Author: Greg Preece — I test AI video tools hands-on to help creators automate boring production tasks and build highly efficient editing workflows.
While industry standards like Adobe Premiere Pro offer incredible power, the manual process of scrubbing through raw footage to slice out bad takes, repetitions, and silences is a massive time sink. In this hands-on guide, I'll show you how switching to a dedicated AI video editor can completely automate your rough cut and save you hundreds of editing hours every year.
Quick Summary
If you are tired of spending hours slicing out mistakes, "umms," and bad takes, Gling AI is a game-changer. It automatically transcribes your raw footage, detects and deletes repetitive takes, and exports a clean XML rough cut directly back to Adobe Premiere, DaVinci Resolve, or Final Cut Pro—saving you 2 to 3 hours on every video you edit.
Table of Contents
- The Hidden Time Sink in Traditional Editing
- What Is Gling AI?
- How It Works: Step-by-Step AI-Powered Rough Cut Workflow
- Step 1: Upload Your Raw Footage
- Step 2: Let Gling AI Detect Bad Takes
- [Step 3: Review and Refine via Text Transcription](#step-3-review-and-refine-via-text-transcription)
- Step 4: Fine-Tune Your Pacing and Spacing
- Step 5: Export as XML to Your Main NLE
- Beyond Rough Cuts: Other Advanced Features
- The Verdict: Who Is Gling AI For?
- Frequently Asked Questions
Prefer to watch? Here's the video. Prefer to skim? The full breakdown is below.
Quick Link
Gling AI: Try it here: Try Gling AI →
The Hidden Time Sink in Traditional Editing
Traditional video editing software like Adobe Premiere Pro is incredibly powerful. But let’s be honest: certain parts of the editing process take far too long. Because Premiere and other standard non-linear editors (NLEs) have limited native AI automation, creators are forced to manually scrub through hours of footage just to perform the basic "rough cut."
As someone who is obsessed with time-saving, wasting hours cutting out silent gaps and bad takes drove me crazy. That is why I switched to a dedicated AI video editor to handle the first stage of my edits. It has completely automated the most tedious part of my production pipeline, saving me around two to three hours on every single video I edit.
What Is Gling AI?
Gling AI is a specialized desktop application (available for Windows and macOS) designed to automate the rough-cut stage of video editing.
Instead of asking you to abandon your professional editor (like Premiere Pro, Final Cut, or DaVinci Resolve), Gling AI acts as a pre-editor. It handles the initial cleanup phase—transcribing your audio, identifying and deleting bad takes, removing silences, and trimming filler words—so you can import a clean, condensed timeline directly into your main editor for the creative heavy lifting.
How It Works: Step-by-Step AI-Powered Rough Cut Workflow
Here is exactly how I use Gling AI to clean up my raw recordings in minutes.
Step 1: Upload Your Raw Footage
First, open Gling AI on your computer and upload your raw video or audio files.
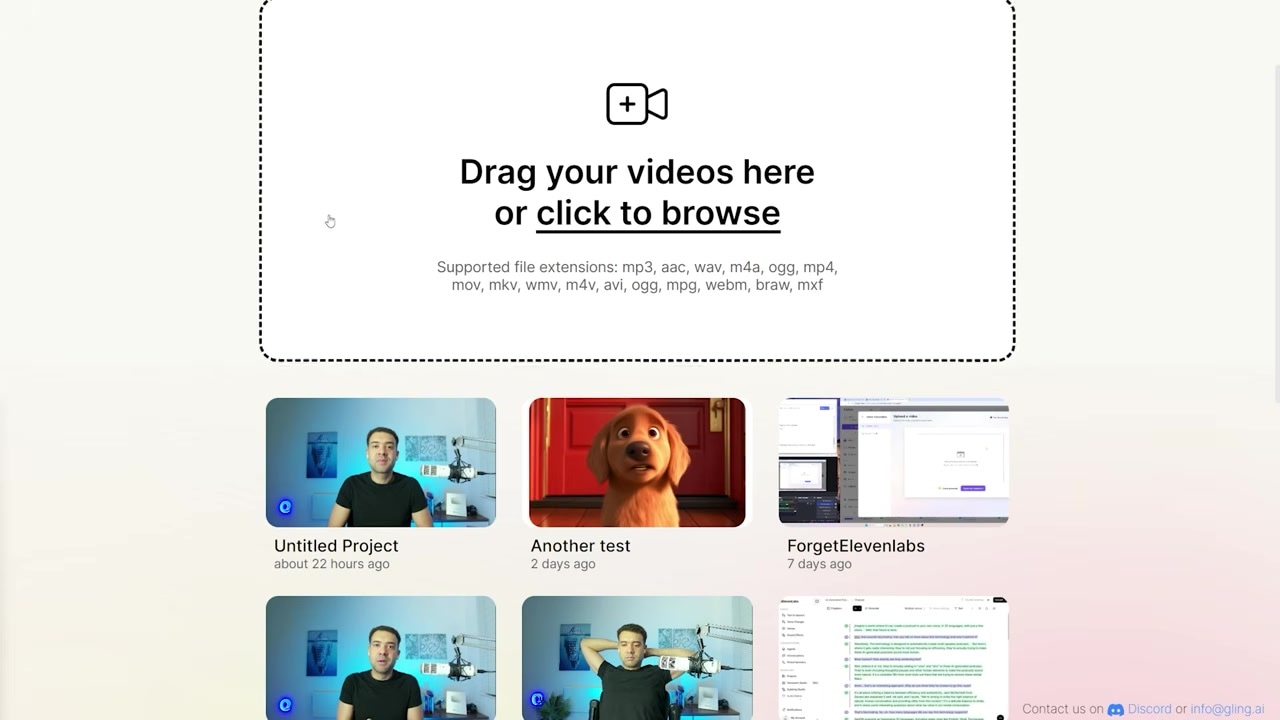
Caption: Drag and drop your raw, unedited footage directly into Gling AI to start the processing.
Step 2: Let Gling AI Detect Bad Takes
Once your recording is loaded, you will see Gling’s AI features panel. Click the "Cut bad takes" button. If you are focused strictly on cleaning up mistakes, this is your primary tool. Once selected, click "Enhance and edit" to let the AI process the file.
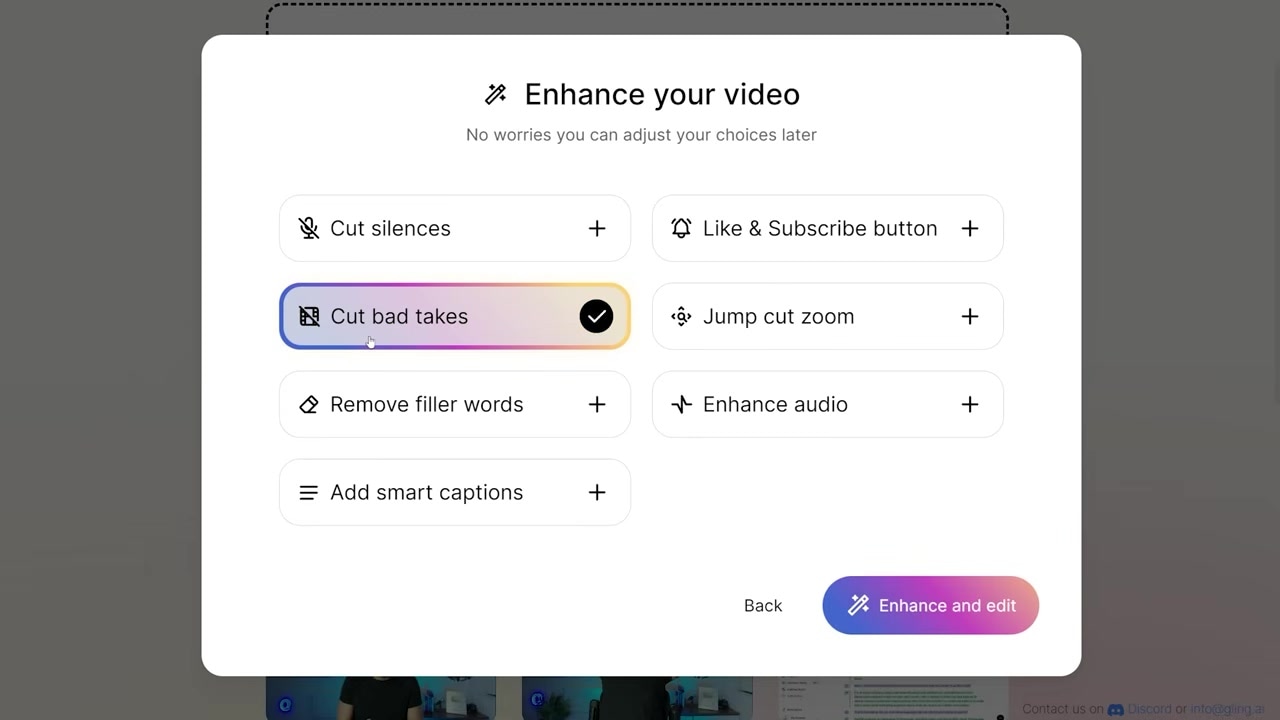
Caption: Select "Cut bad takes" and click "Enhance and edit" to let the AI scan your footage for repetitions and silent gaps.
Step 3: Review and Refine via Text Transcription
After processing, Gling AI presents a clean, three-panel interface:
- Right Side: A real-time video preview.
- Bottom: The visual timeline showing all cuts.
- Left Side: A line-by-line interactive text transcription of everything spoken in your video.
Gling AI automatically identifies repetitions and bad takes, graying them out with a strikethrough in the text transcription.
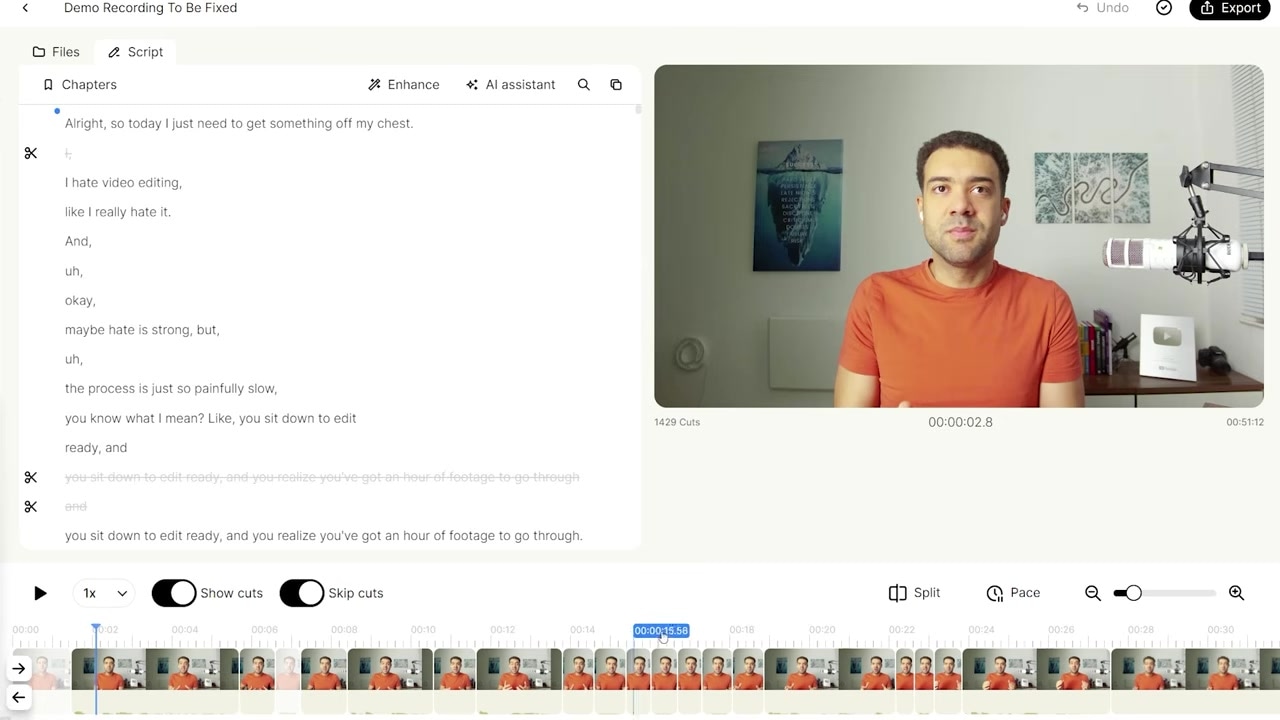
Caption: The text transcription displays automatically grayed-out and struck-through bad takes, which are instantly cut from the timeline.
If I click a specific line of text on the left, the timeline marker immediately jumps to that precise moment. If the AI missed an extra mistake, or if I want to manually trim additional content, I simply read the text transcript, click the cut (scissor) icon next to the line, and delete it.
Conversely, if Gling AI made a mistake and removed a line I wanted to keep, I can simply click the text line again to instantly restore it back to the timeline.
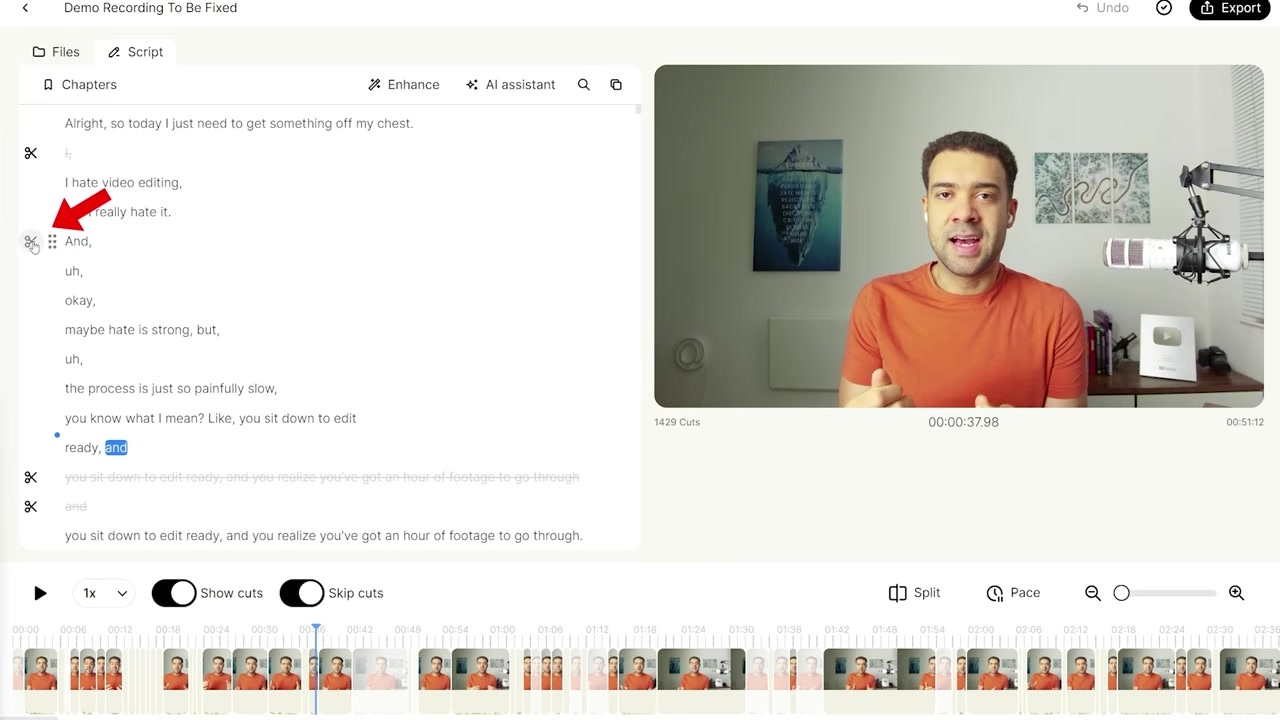
Caption: Easily cut additional footage or restore deleted clips by interacting directly with the transcribed text.
Step 4: Fine-Tune Your Pacing and Spacing
Different video styles require different pacing. If you find that the AI's cuts are too tight—or if you want to leave more breathing room after a sentence—you can easily customize the spacing.
Click on the timing settings screen to adjust the exact amount of buffer time (in seconds) left before and after every automated cut.
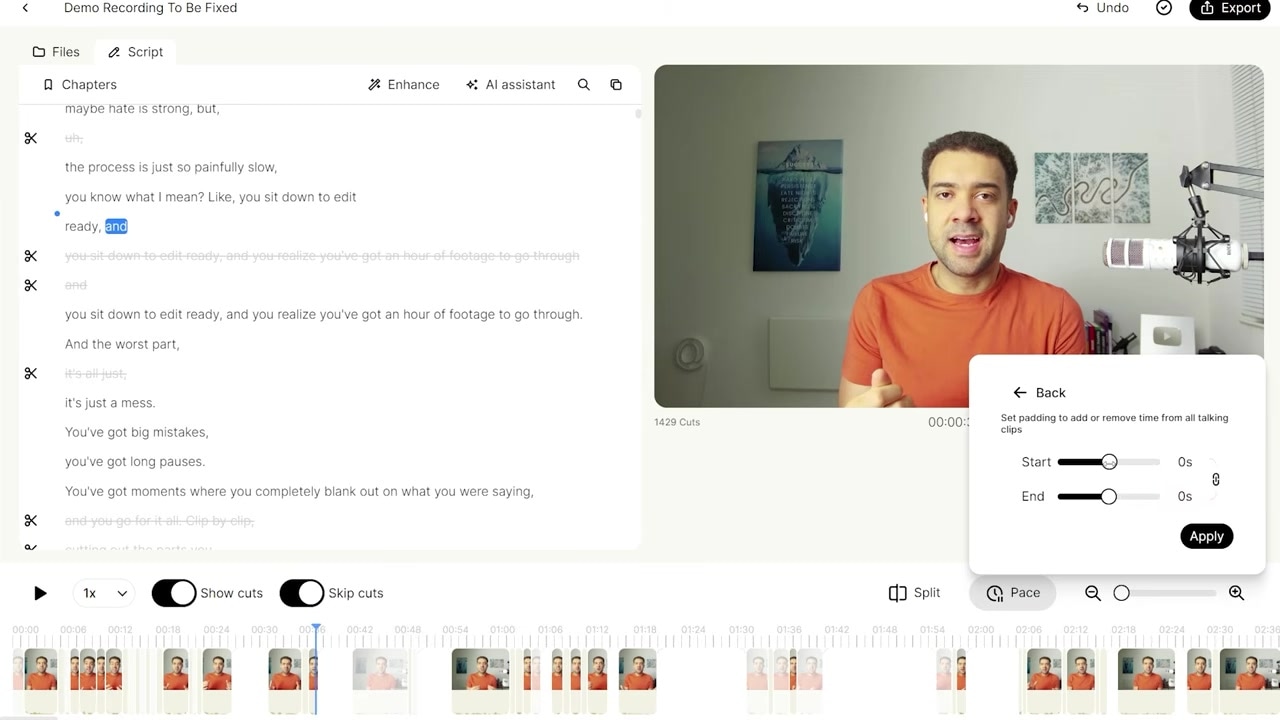
Caption: Adjust the pacing settings to control the exact duration of silence allowed before and after each edit.
Step 5: Export as XML to Your Main NLE
This is my favorite part of the entire workflow. Once you are happy with the rough cut in Gling AI, you do not have to export a flattened, finished video file. Instead, head over to the Export menu.
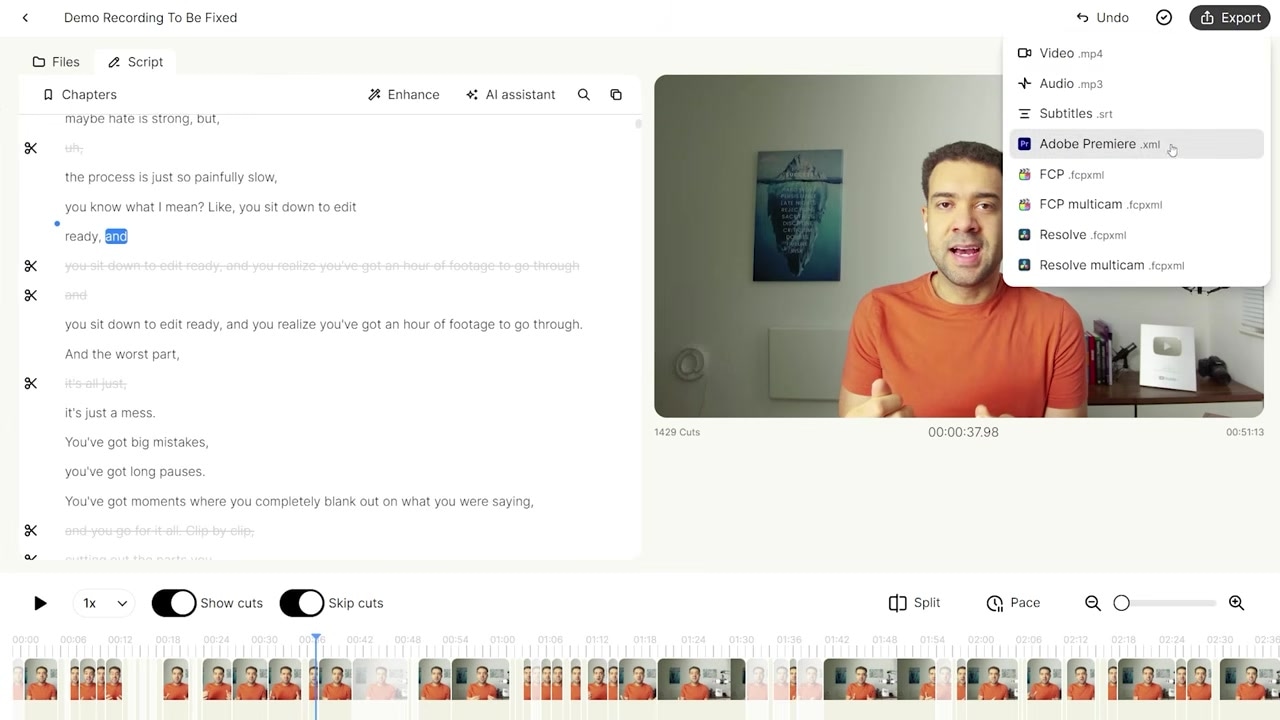
Caption: Export your project as an XML file to preserve all non-destructive cuts when transferring to your professional editor.
Select the XML export option for your specific editing software:
- Adobe Premiere Pro
- DaVinci Resolve
- Final Cut Pro
Import this XML file into your professional editor. It will load as an active, editable timeline with all of Gling's cuts already in place. This allows you to handle color grading, visual effects, B-roll, music, and sound design natively, without ever having to waste time on the initial rough cut.
Beyond Rough Cuts: Other Advanced Features
While automating bad takes is where Gling AI excels, it is not a one-trick pony. The software has evolved to support a variety of automated features to help creators polish their work, including:
- AI-Generated Captions: Instantly create and style animated captions for your videos.
- Automated B-Roll: Let the AI suggest and insert relevant B-roll clips based on your transcript.
- YouTube Optimization Tools: Generate titles and chapters directly inside the app to save time during publishing.
The Verdict: Who Is Gling AI For?
Gling AI has completely transformed my editing pipeline. It does not replace Adobe Premiere Pro for creative, high-end work—and it isn't meant to. Instead, it eliminates the "rough-cut tax" that every creator pays.
If you shoot talking-head videos, tutorials, or podcasts, and you find yourself wasting hours slicing out "umms," silence, and repetitive takes, you need this tool. It allows you to delegate the boring, repetitive tasks to AI so you can jump straight into the fun, creative part of editing.
If you want to try it out, you can get started for free on a trial using the link below:
Gling AI: Try it here: Try Gling AI →
Frequently Asked Questions
Can I use Gling AI if I edit in Final Cut Pro or DaVinci Resolve?
Yes! Gling AI integrates seamlessly with Final Cut Pro, DaVinci Resolve, and Adobe Premiere Pro. It exports native XML timeline files so you can keep your existing editing workflow.
Does Gling AI completely replace software like Premiere Pro?
No. Gling AI is designed to replace the first stage of your editing workflow (the rough cut). You will still want to use Premiere Pro or your preferred NLE for advanced sound design, color grading, multi-camera nesting, and detailed creative adjustments.
How accurate is Gling AI's automatic bad-take removal?
In my experience, Gling AI is currently the most accurate AI on the market for detecting repetitive takes and silences. Its layout makes it incredibly easy to manually review and override any cuts with a single click of the transcribed text.