How to Clone Voice with AI: I Did It in Under 60 Seconds
Last updated: July 2026
Author: Greg Preece — I test AI video tools hands-on to help content creators speed up their workflows and grow their channels.
Cloning your voice with AI used to be expensive, complicated, and slow. In this guide, I'll show you how to clone your voice for free in under 60 seconds and instantly apply it to your video projects using a simple, beginner-friendly workflow.
TL;DR: You can clone your voice with AI for free in under a minute. Instead of paying for expensive standalone software, you can use Wondershare Filmora's built-in Text-to-Speech tool to create a highly accurate voice clone, generate custom voiceovers, and instantly sync them with automated, styled subtitles in a single workflow.
Prefer to watch? Here's the video. Prefer to skim? The full breakdown is below.
Quick Link
Try Wondershare Filmora here: Try Wondershare Filmora →
Table of Contents
- The AI Tool for Quick, Free Voice Cloning
- Step-by-Step: How to Clone Your Voice
- How to Add Your Cloned Voice to Videos
- How to Generate Automated Subtitles for Your Voice
- How to Tweak Your AI Voice with Effects
- Frequently Asked Questions
The AI Tool for Quick, Free Voice Cloning
When I tested various voice cloning tools, I noticed a massive problem: they are usually expensive, difficult to navigate, slow to process, and often yield metallic, unnatural results.
If you are a creator, you also face the friction of having to export your audio from a standalone voice cloner and import it back into your video editing timeline.
To bypass this headache, I recommend using Wondershare Filmora. It is an all-in-one video editor that features a built-in, highly accurate voice cloning tool. It is incredibly easy to use, completely free to get started with, and replicates your voice in less than a minute.
Step-by-Step: How to Clone Your Voice
To clone your voice with AI inside Wondershare Filmora, you will use a built-in text-to-speech process. I set this up myself, and the entire training process took me less than 60 seconds.
Here is the exact step-by-step workflow:
Step 1: Add a Text Template to the Timeline
Open your video project in Wondershare Filmora. To type in what you want your AI voice to say, click the Titles tab at the top of the interface. Select the Basic 1 text template and drag it down onto your timeline.
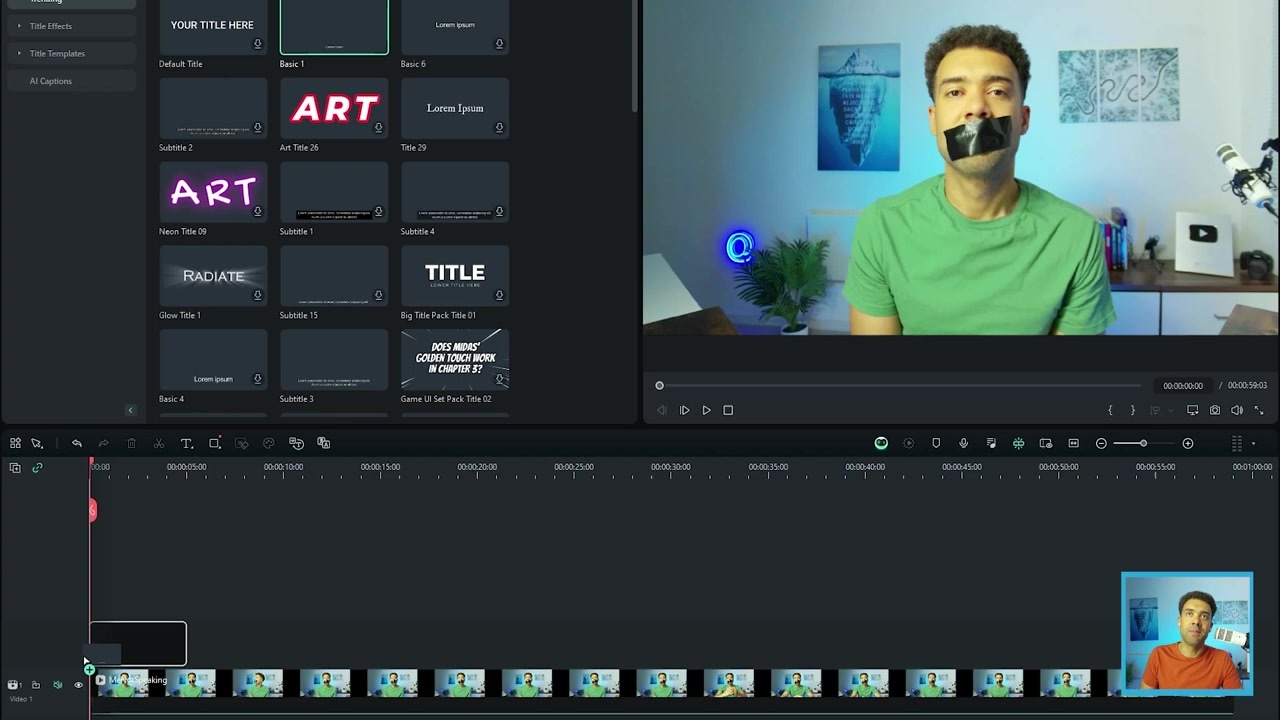
Caption: Drag the Basic 1 text template onto your timeline and type what you want your AI voice to say.
Step 2: Open the Text to Speech Panel
Double-click your text block on the timeline. On the right-hand side, type in the custom script you want your voice to read. With that text layer still selected, click the Text to Speech tab in the settings panel.
Step 3: Record the Permission Script
In the Text to Speech menu, select your native language (for example, I chose UK English). Next, click the Clone Voice button.
You will see a permission prompt pop up. Filmora requires you to record yourself reading a short statement to confirm you authorize the cloning of your voice. Press record, read the short script, and press stop.
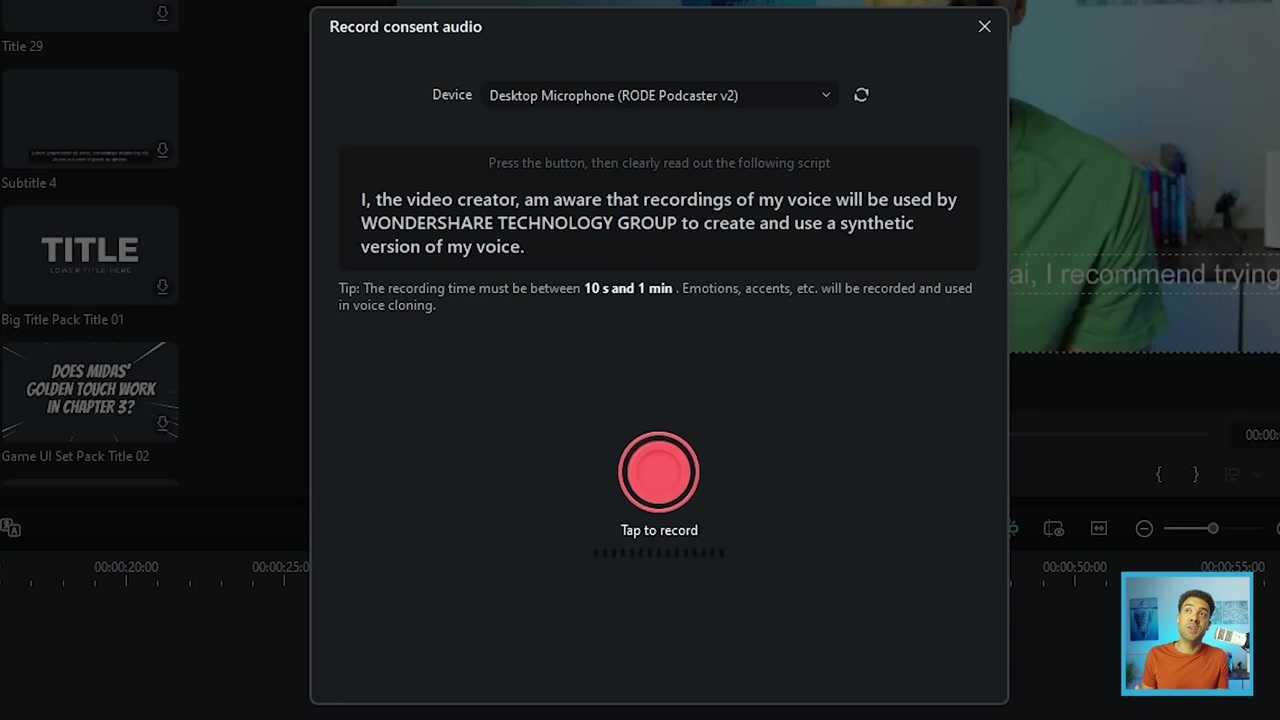
Caption: Click "Clone Voice" in the Text-to-Speech settings and record the authorization script to grant permission.
Step 4: Record the Training Script
Next, type a custom name for your clone in the voice name field (I named mine "Greg AI Voice Clone").
A short paragraph will appear on your screen. Press record and read through the paragraph clearly using your natural speaking voice. You have between 20 seconds and one minute to complete this reading, so take your time and speak clearly.
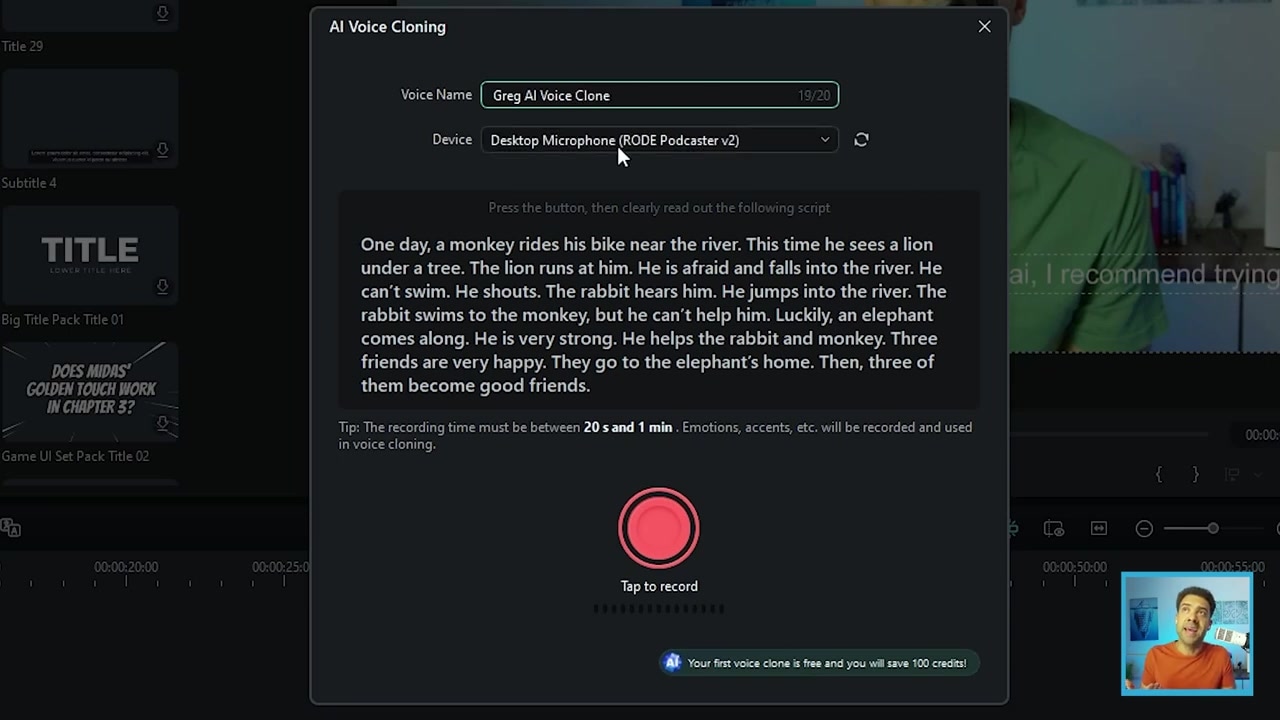
Caption: Name your custom voice clone and clearly read the on-screen script to train the AI model.
Step 5: Generate Your Voice Clone
Listen back to your recording. If you are happy with how it sounds, click the Try Free button to generate your custom clone. Wondershare Filmora grants you free voice clones to get started.
Within less than 60 seconds, the AI will build your custom voice clone and add it directly to your Text to Speech menu.
How to Add Your Cloned Voice to Videos
Once your custom voice clone is created, generating and syncing speech on top of your video clips is simple.
- Select your text layer on the timeline containing your written script.
- Go back to the Text to Speech tab and select your newly created custom voice clone from the list.
- Click the Try Free button.
The AI will generate the voice track almost instantly and place a brand-new audio file directly onto your timeline, perfectly matched to the duration of your text.
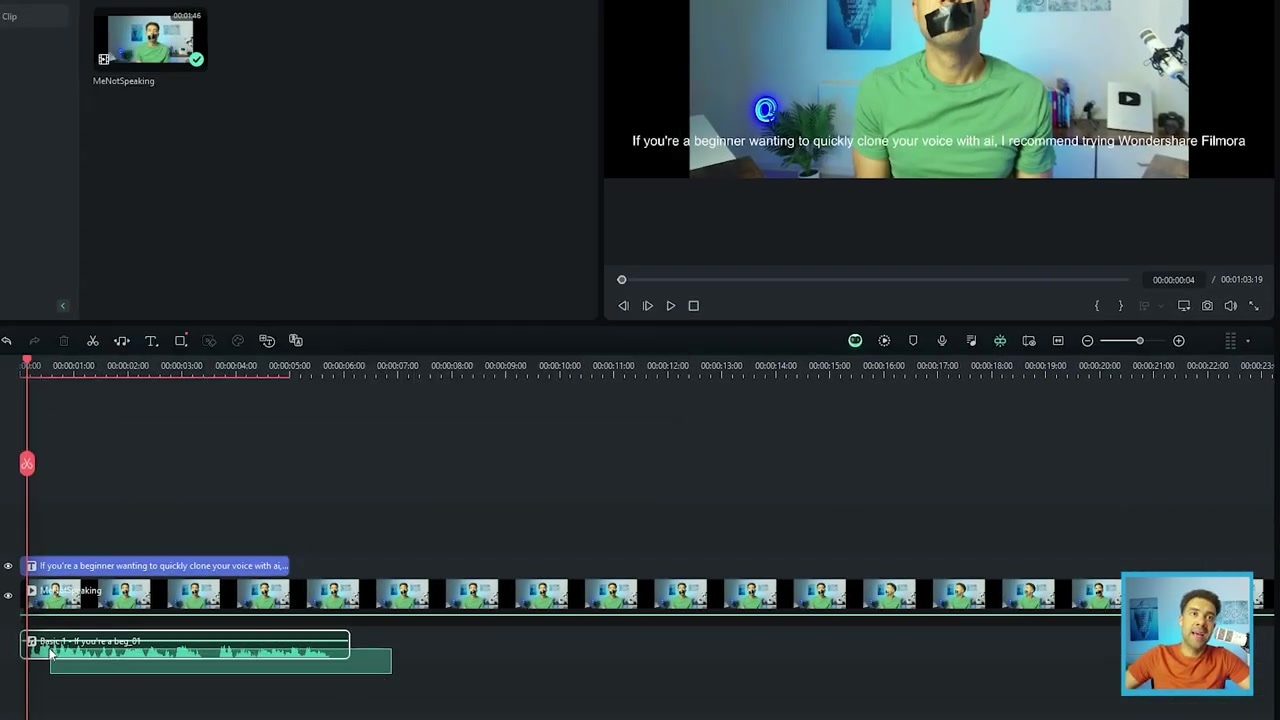
Caption: Once generated, your custom AI voice clone will appear on your audio timeline beneath your text.
To add additional spoken segments to your video, simply drag another text block onto the timeline, type your next script, and repeat the Text to Speech process. The AI will quickly generate and lay down the matching voiceover tracks sequentially.
How to Generate Automated Subtitles for Your Voice
Adding highly visual, styled subtitles makes your content significantly more engaging. Wondershare Filmora allows you to auto-generate subtitles from your cloned AI voice tracks in just a few clicks.
Here is how I set it up:
- Hold down your mouse and select all the generated AI voice audio clips on your timeline.
- Go to the top menu and click Tools > Audio > Speech to Text.
- Choose to transcribe only your selected clips, select your target output, and click OK.
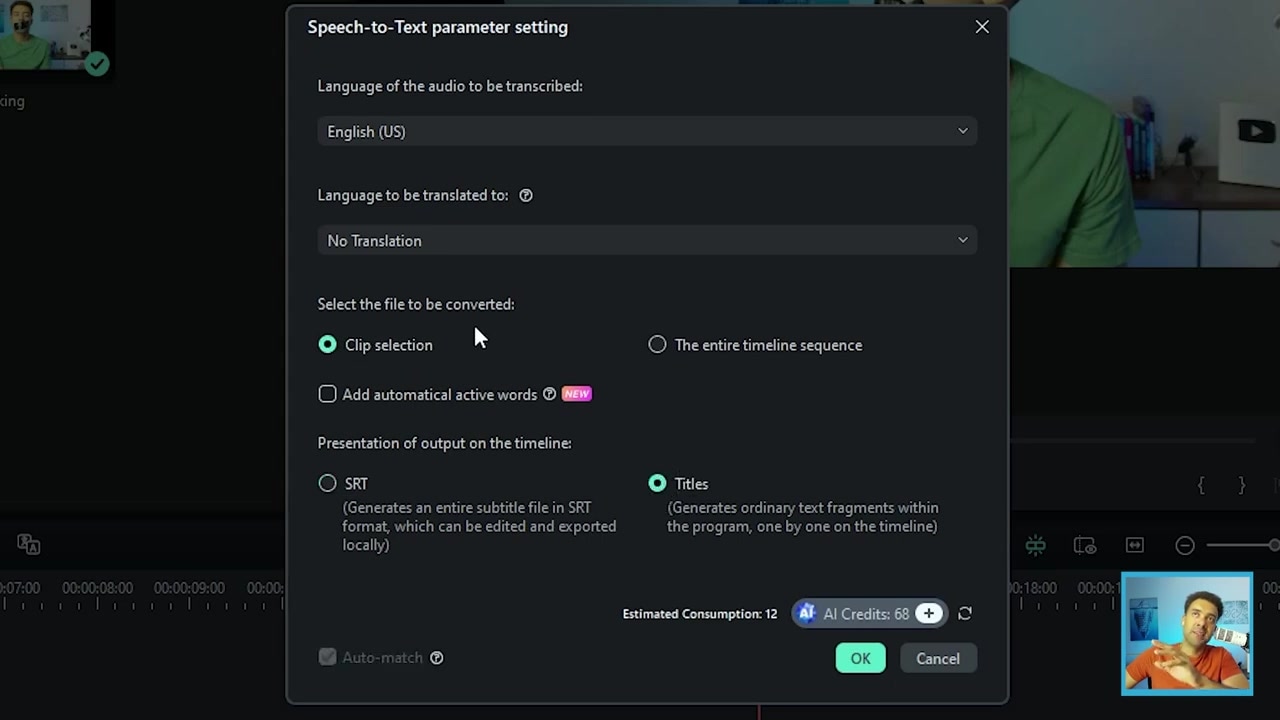
Caption: Select your AI voice clips, then go to Tools > Audio > Speech to Text to generate automated subtitles.
The software will automatically analyze your AI audio clips, transcribe the words, and generate a new subtitle track perfectly synced to your voice.
To style your subtitles, select the caption layer on your timeline and click Titles. From there, you can choose a modern font, increase the size, and apply pre-made styled templates. You can also add active text animations—like a dynamic Zoom In effect—to make your captions pop.
How to Tweak Your AI Voice with Effects
If you want to modify your voice clone for creative storytelling, comedic effect, or specific video scenarios, you can easily alter your custom voice track.
- Click on the generated AI voice audio file in your timeline.
- Look at the top right settings panel and select Voice Changer.
- Adjust the sound using Voice Filters to alter the environment (for example, applying a "Big Room" effect to add echo).
- Alternatively, click Voice Characters to completely transform the tone (such as converting your voice clone into a stylized "Robot").
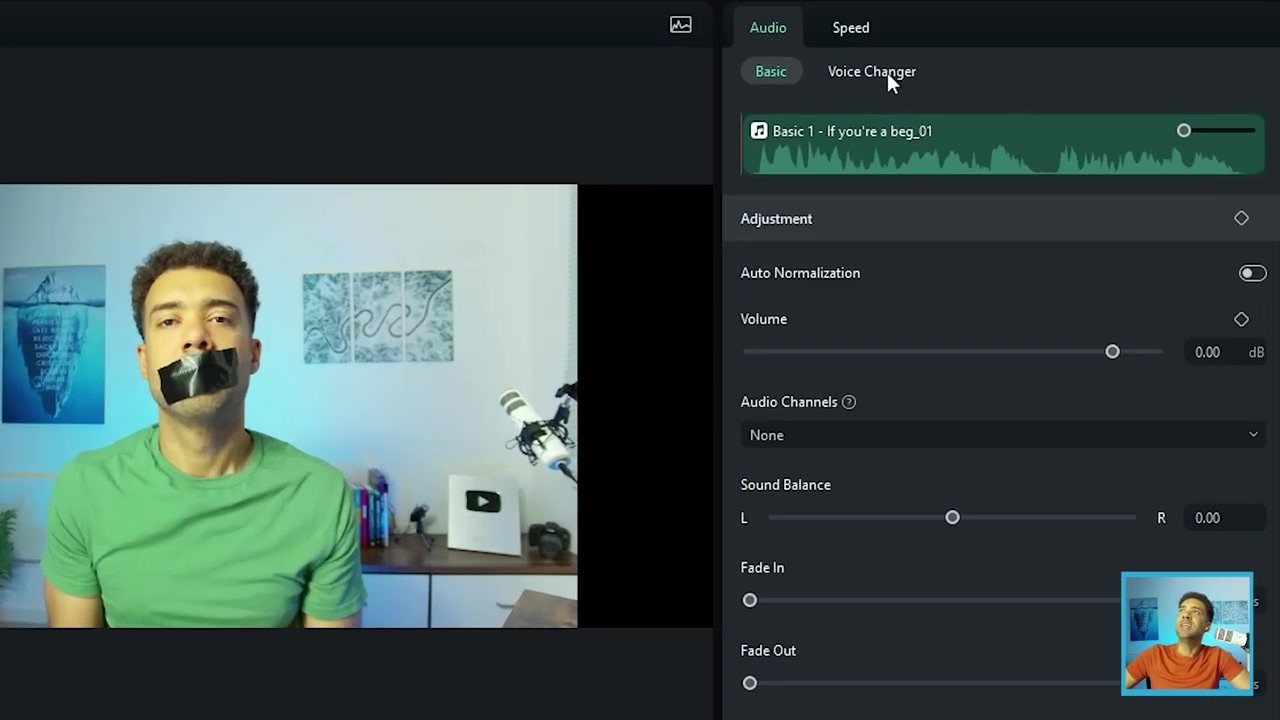
Caption: Select your audio track and use the Voice Changer panel to apply environmental or character voice filters.
These tools allow you to dynamically alter your synthetic voice's pitch and characteristics on the fly without having to re-record anything.
Try Wondershare Filmora for free to create your first voice clone: Try Wondershare Filmora →
Frequently Asked Questions
Is Wondershare Filmora's voice cloning completely free?
Yes. Wondershare Filmora gives you one free trial of Voice Modeling, formerly called AI voice cloning, with each session after that costing 100 AI credits. That is enough to test the voice accuracy and output quality on your own projects before committing to a paid plan.
How long does the voice cloning process take?
The training process requires you to read a short verification statement and a 20-to-60-second script. Once you submit your recording, the AI generates your synthetic voice in under 60 seconds.
Can I style the subtitles generated from my AI voice?
Yes. You can fully customize your auto-generated subtitles. Wondershare Filmora lets you change the font family, increase text size, apply custom color templates, and add active motion graphics like a dynamic zoom-in effect.